Max and Ruby Cake Recipe

I’ll never forget the first time I baked the Max and Ruby Cake for my niece’s birthday. She had just discovered the Max and Ruby show, and she insisted the cake had to feature both characters. I wasn’t sure how to translate cartoon charm into dessert, but as soon as I started mixing the batter, the kitchen filled with a warm, buttery aroma that felt like childhood wrapped in vanilla and cocoa. My niece kept hovering over the counter, giving me running commentary about which character should go on top first.
The recipe itself wasn’t complicated, but the real magic came in watching the frosting swirl into playful shapes and colors. I accidentally added too much red food coloring on my first try—the pink turned a bit too bold—but we embraced the “Ruby red” mishap and laughed. By the time we set the cake on the table, the way her eyes lit up was worth every sticky finger I had acquired along the way.
This cake is more than a dessert; it’s an experience—a playful, sweet, and slightly whimsical journey that makes every bite a little story of its own.
The Secret Behind Its Flavor
What makes this cake stand out isn’t just the whimsical decorations—it’s the balance of flavors baked into each layer. A tender vanilla sponge forms the base, rich yet light, while a subtle almond extract gives it a warm, cozy note without overwhelming the sweetness. The frosting is creamy but not too heavy, the kind that melts slowly on the tongue, letting both characters and flavors shine.
I like to think of it as a cake that talks to the senses. The first bite gives you a soft crumb that dissolves just enough to carry the frosting, and then a hint of almond keeps you coming back. If you’ve ever wondered why some children’s cakes taste so delightfully nostalgic, this is it—a careful blend of childhood sweetness and grown-up flavor nuance.
Ingredients in Context
I’ve always believed that the ingredients you choose can make or break a cake like this. For the sponge, I prefer using high-quality unsalted butter—it makes the crumb richer and ensures the frosting sticks without sliding. For the eggs, large, room-temperature eggs help the batter emulsify better, resulting in a lighter texture.
As for the vanilla extract, don’t skimp. A natural, pure vanilla extract makes a noticeable difference compared to the artificial stuff. The almond extract is optional but adds that extra layer of warmth. If you’re short on almond extract, you can substitute with a teaspoon of finely ground almonds or even a splash of coconut extract for a subtle twist.
When it comes to frosting, I often use a combination of butter and cream cheese—it’s stable, easy to pipe, and gives that tangy-sweet balance that kids love. And for the colors? Gel food coloring works best. Liquid food coloring can dilute the frosting and make it runnier, which is the last thing you want when decorating tiny cartoon faces.
Step-by-Step Instructions
Start by preheating your oven to 350°F (175°C) and greasing your cake pans. I like to line the bottoms with parchment paper—it’s a small step, but it guarantees a smooth release.
- Cream the butter and sugar until light and fluffy. This usually takes about 3–5 minutes with a stand mixer, but don’t rush it. Properly creamed butter traps air, giving your sponge that tender lift.
- Add eggs one at a time, beating gently after each addition. Fold in vanilla and almond extract. At this stage, the batter smells like sweet memories.
- Sift together flour, baking powder, and salt. Gently fold them into the wet mixture in batches, being careful not to overmix—overmixing can make the sponge dense.
- Divide the batter evenly between two 8-inch pans. Bake for 25–30 minutes, or until a toothpick comes out clean. The first time I tried this, my timer was off by five minutes, and the cake came out slightly golden around the edges. Not perfect, but the flavor was still amazing.
- Let the cakes cool completely before frosting. Cooling is crucial; even the slightest warmth can melt your frosting and ruin your decorations.
- For the frosting, beat butter until creamy, then add cream cheese and sifted powdered sugar gradually. Mix until smooth, then divide and color portions as desired. Pipe or spread over the cakes, creating Max and Ruby shapes—or just go abstract if you’re feeling adventurous.
Substitutions & Adaptations
This cake is versatile. For a dairy-free version, swap butter for a high-quality vegan margarine and use plant-based cream cheese. You can also replace eggs with flax eggs (1 tbsp ground flax + 3 tbsp water per egg, let sit for 5 minutes).
If gluten is a concern, a 1:1 gluten-free flour blend works surprisingly well, though the texture may be slightly more crumbly. And for a kid-friendly twist, swap almond extract for vanilla only, and keep the frosting colors soft pastel for less sugar intensity.
I’ve even experimented with adding finely grated carrots or zucchini for a subtle veggie boost—they disappear in the sponge but make the cake slightly moister and more forgiving.
Serving Ideas and Presentation Tips
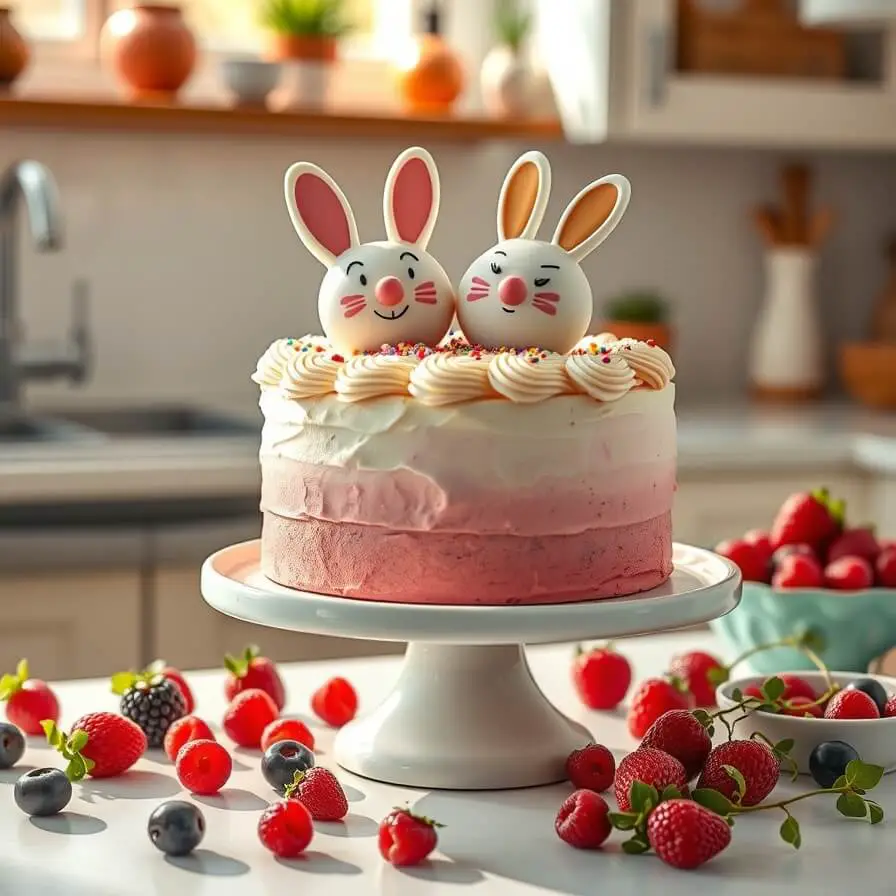
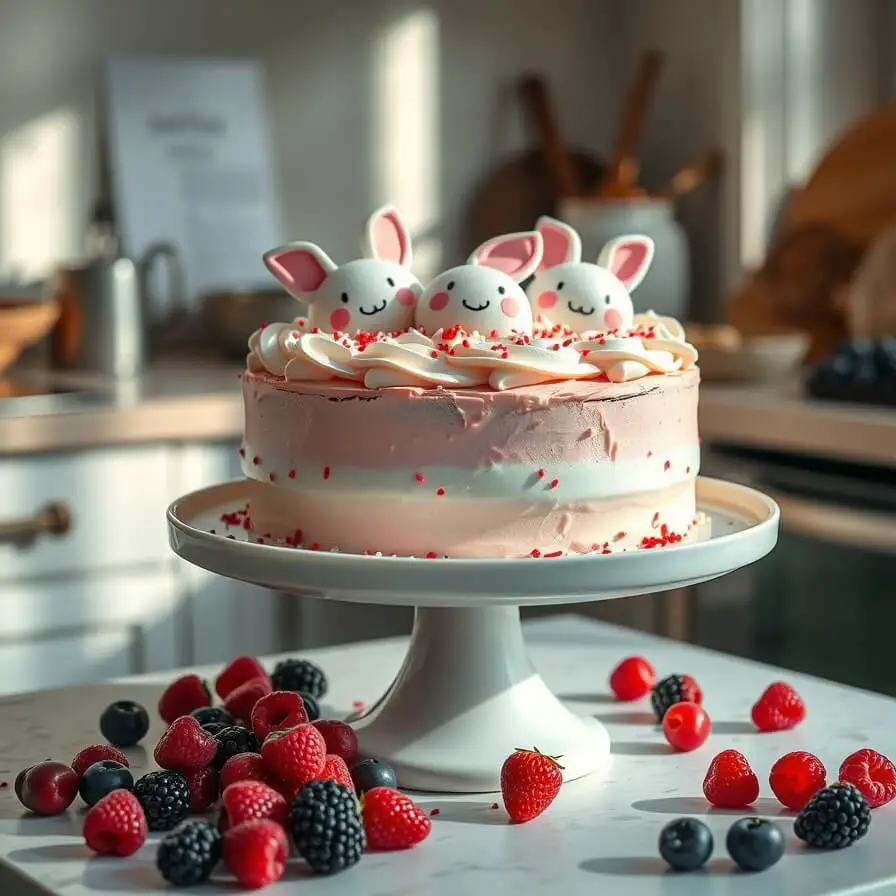
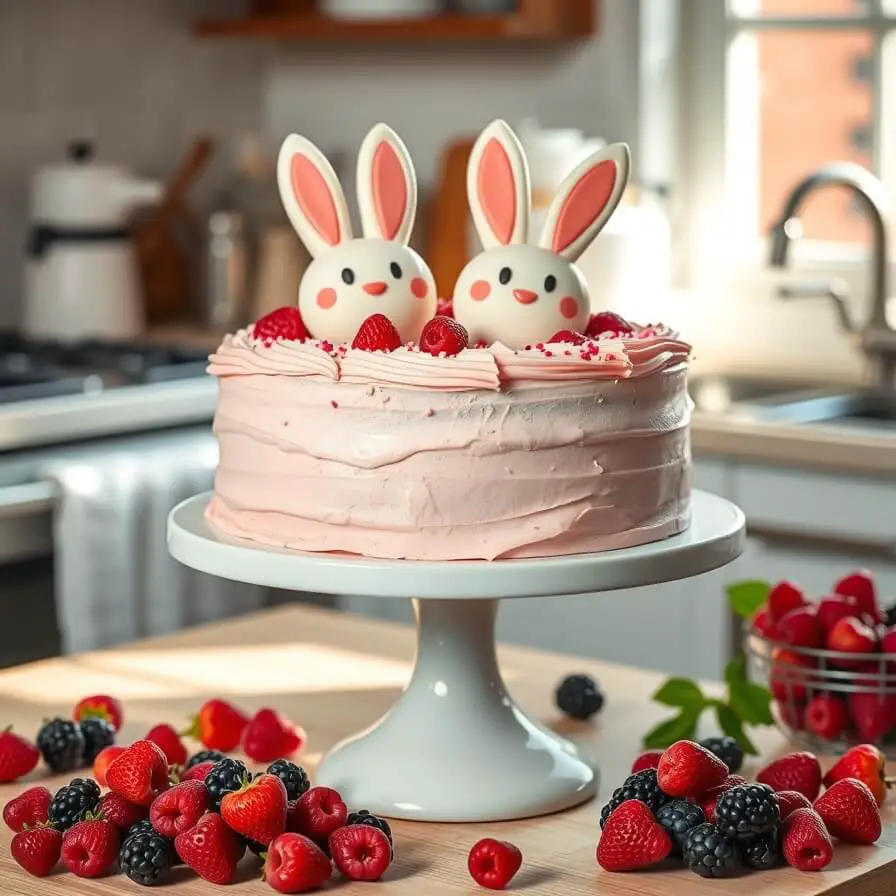
Once your Max and Ruby Cake is frosted, the fun part begins—presentation. I like to place the cake on a simple white platter so the colors pop. For little Max and Ruby faces, piping gel or melted chocolate works beautifully for the eyes and mouths. Sprinkles can add a festive touch, but I usually keep them minimal so the characters stay the focal point.
If you’re hosting a birthday party, consider serving slices alongside fresh berries or a light fruit coulis. The tartness of raspberries or blueberries balances the sweetness of the cake and makes each bite feel a bit lighter. I’ve even arranged small themed decorations around the cake—tiny carrots for Ruby, or a toy bunny for Max—to turn the dessert into a playful centerpiece.
Even for casual family afternoons, I love cutting the cake into small squares and serving with a dollop of whipped cream. My niece prefers this method—it’s easier to grab and still keeps all the fun of the cartoon characters intact.
Pro Notes and Mistakes to Avoid
Baking this cake isn’t complicated, but a few missteps can make a big difference.
- Overmixing the batter: This can create a dense, chewy sponge. Fold gently and avoid rushing.
- Warm cake layers: Frosting warm layers can melt the icing and ruin your decorations. Patience is key.
- Food coloring overload: Too much gel or liquid coloring can change the frosting texture or make it too runny. Add gradually until you reach the right shade.
- Uneven layers: I always level my cakes with a serrated knife before frosting. It may seem tedious, but it makes a huge difference in the finished look.
One time, I accidentally left the cake in the oven a few minutes too long. The edges were slightly crisp, but the aroma told me to trust my senses instead of the timer—after frosting, it was still delicious, and my niece didn’t notice a thing. These small lessons make the process fun rather than stressful.
Storage and Make-Ahead Tips
This cake can be prepared a day in advance, which is perfect for parties. Wrap cooled, unfrosted layers tightly in plastic wrap and store in the fridge or freezer. Frost the cake on the day of serving for best results.
Leftovers keep well in an airtight container at room temperature for 2–3 days. If your kitchen is warm, store in the fridge, but allow slices to come to room temperature before serving—they taste much softer and closer to freshly baked.
You can also freeze frosted slices individually by wrapping them in plastic and then placing in a freezer-safe container. Thaw overnight in the fridge, then let come to room temperature for a perfect, ready-to-eat treat.
FAQs
Can I make this cake gluten-free?
Yes! A 1:1 gluten-free flour blend works well. The texture may be slightly different, but the flavor remains just as delightful.
Can I use a different frosting?
Absolutely. Buttercream, whipped cream, or a cream cheese-butter combo all work. Just make sure your frosting is stable enough for decorating.
How do I prevent the colors from bleeding?
Use gel food coloring instead of liquid, and chill the frosting slightly before piping intricate details.
Can I make this cake ahead for a party?
Yes, bake the layers a day in advance and frost on the day of the event. You can also freeze unfrosted layers for up to a month.
Is it kid-friendly?
Definitely. The flavors are mild, the frosting sweet but not overpowering, and the playful characters make it a hit with little ones.

Max and Ruby Cake Recipe
- Total Time: 55 minutes
- Yield: 8–10 1x
- Diet: Vegetarian
Description
This Max and Ruby Cake combines a light vanilla sponge with creamy frosting and playful decorations inspired by the beloved cartoon. Perfect for birthdays, family gatherings, or any day that deserves a fun, sweet centerpiece. Customize the colors and flavors to match your celebration.
Ingredients
- 1 cup unsalted butter, softened
- 1 ½ cups granulated sugar
- 4 large eggs, room temperature
- 2 tsp pure vanilla extract
- ½ tsp almond extract (optional)
- 2 ½ cups all-purpose flour (or gluten-free blend)
- 2 ½ tsp baking powder
- ½ tsp salt
- 1 cup whole milk (or plant-based alternative)
2. For frosting:
- 1 cup unsalted butter, softened
- 8 oz cream cheese, softened
- 4 cups powdered sugar
- Gel food coloring as desired
Instructions
- Preheat oven to 350°F (175°C) and grease two 8-inch cake pans. Line with parchment paper.
- Cream butter and sugar until light and fluffy.
- Beat in eggs one at a time, then add vanilla and almond extract.
- Sift together flour, baking powder, and salt; fold gently into wet ingredients in batches.
- Pour batter into pans and bake 25–30 minutes, until a toothpick comes out clean. Cool completely.
- Beat butter until creamy, add cream cheese, then powdered sugar gradually. Mix until smooth. Divide and color portions as desired.
- Frost the cooled layers, pipe Max and Ruby faces or creative designs. Decorate with minimal sprinkles or small themed items if desired.
Notes
- Level cakes before frosting for a professional finish.
- Chill frosting slightly if piping intricate details.
- Customize flavors with almond, coconut, or citrus extracts.
- Prep Time: 25 minutes
- Cook Time: 30 minutes
- Category: Dessert
- Method: Baking
- Cuisine: American
Nutrition
- Serving Size: 8–10
- Calories: 420
- Sugar: 38g
- Sodium: 180mg
- Fat: 22g
- Saturated Fat: 13g
- Unsaturated Fat: 7g
- Trans Fat: 0g
- Carbohydrates: 52g
- Fiber: 1g
- Protein: 5g
- Cholesterol: 75mg