Jellycat Cake Recipe
The first time I made a Jellycat cake, it wasn’t because I needed another cake recipe in my life. It was because my niece hugged a plush bunny tighter than her own birthday balloon and said, “I want a cake that feels like this.” That sentence stayed with me. Soft. Gentle. Sweet without being loud.
So this cake was born from that idea — a dessert that looks whimsical and comforting, almost toy-like on the outside, but tastes like a genuinely good homemade cake once you slice into it. Not overly sugary. Not stiff or bakery-dry. Just tender, fluffy layers with a frosting that melts instead of crusts.
I won’t pretend this is a serious, formal cake. It’s not. This is the kind of cake that makes people smile before they even take a bite. The kind that gets photographed from every angle. The kind where someone says, “It’s almost too cute to eat,” and then goes back for seconds anyway.
If you’ve ever wanted to bake something that feels joyful — not perfect, not intimidating — this Jellycat cake might be exactly what your kitchen needs.
Why I Love This Recipe
What makes this Jellycat cake special isn’t just how it looks, though that soft pastel charm definitely helps. It’s the balance between playful design and real, dependable flavor. I’ve seen too many novelty cakes that look beautiful but taste forgettable. This one isn’t like that.
The sponge is light but sturdy enough to carve or shape gently, which is important if you’re going for that plush-toy look. The crumb stays moist for days, so you don’t panic if you need to bake ahead. And the frosting — oh, the frosting — is creamy, not tooth-achingly sweet, and smooth enough to create that soft, fuzzy illusion without using complicated techniques.
People make this cake for birthdays, baby showers, Easter tables, and even cozy afternoon celebrations where there’s no real reason other than “we felt like cake.” It’s especially loved by kids, but adults always surprise me by how emotionally attached they get to it. There’s something nostalgic about it.
This recipe invites you to slow down, enjoy the process, and remember that baking doesn’t always have to be impressive in a traditional way. Sometimes, it just needs to feel warm.
Ingredients for Jellycat Cake
Let’s talk ingredients, because this cake doesn’t rely on anything strange or hard to find. What matters most here is quality and balance.
You’ll start with basic cake staples — all-purpose flour for structure, baking powder for lift, and a pinch of salt to keep everything from tasting flat. Butter is essential. I always use unsalted butter, softened properly, not half-melted, because it sets the tone for the entire crumb.
Sugar should be fine, white granulated sugar. We’re not chasing deep caramel notes here. This cake is meant to taste clean and gentle. Eggs bring richness and stability, and I prefer room-temperature eggs so the batter emulsifies smoothly.
Milk adds moisture, but whole milk works best. It gives the sponge that plush softness we’re after. A little vanilla extract rounds everything out without overpowering the cake.
For the frosting, cream cheese or buttercream both work, but I lean toward a lightly whipped buttercream with a touch of cream. It spreads like a dream and holds soft shapes beautifully. Powdered sugar should be sifted — this is one step I never skip — and a splash of vanilla keeps it cozy and familiar.
Optional food coloring is where the Jellycat personality comes in. Soft pastels only. Think blush, cream, pale sage, or baby blue. Less is more.
How Much Time Will You Need
This isn’t a rushed, one-bowl cake, but it’s also not an all-day commitment. From start to finish, you’re looking at about two and a half to three hours, including cooling and decorating.
The baking itself takes under an hour, depending on your oven and pan size. Cooling is important here, so don’t cheat it. Warm cake and soft frosting don’t mix well. Decorating can be quick or slow depending on how detailed you want to get.
I usually break it up — bake in the morning, decorate later. It keeps the process enjoyable instead of stressful.
How to Make This Jellycat Cake
Step – 1: Preheat your oven and prepare your pans
Set your oven to 170°C (340°F). Grease and line your cake pans with parchment paper. This cake deserves a clean release, so don’t rush this part.
Step – 2: Cream the butter and sugar
In a large bowl, beat the softened butter and sugar together until pale and fluffy. This takes a few minutes, and it’s worth waiting until the mixture looks almost whipped. That air is what makes the cake soft.
Step – 3: Add the eggs slowly
Crack in the eggs one at a time, beating well after each addition. If the mixture looks slightly curdled, don’t panic. It will smooth out once the dry ingredients go in.
Step – 4: Combine dry ingredients separately
In another bowl, whisk together flour, baking powder, and salt. This ensures even distribution and prevents uneven rising.
Step – 5: Alternate dry ingredients and milk
Add the flour mixture in batches, alternating with milk. Start and end with flour. Mix gently, just until combined. Overmixing is the enemy of softness.
Step – 6: Bake until just done
Pour the batter evenly into pans and bake until a toothpick comes out clean. The tops should spring back lightly when touched.
Step – 7: Cool completely
Let the cakes cool in the pans briefly, then transfer to a rack. They must be completely cool before frosting.
Step – 8: Make the frosting
Beat butter until creamy, then gradually add powdered sugar. Add cream and vanilla, beating until soft and spreadable. Tint gently if using color.
Step – 9: Assemble and decorate
Layer, frost, and smooth the cake. Use soft strokes to mimic that plush Jellycat look. Imperfect is perfect here.
Substitutions
If you don’t have everything on hand, this recipe is forgiving. You can swap whole milk with plant-based milk like almond or oat without losing softness. Butter can be replaced with a good-quality dairy-free alternative if needed, though the flavor will shift slightly.
Cream cheese frosting works beautifully if you want a slight tang. You can also reduce sugar slightly if you prefer a less sweet cake — just don’t cut too much or the structure will suffer.
The beauty of this cake is adaptability. It wants to work with you, not against you.
Best Side Dish of Jellycat Cake
A warm cup of vanilla or chamomile tea pairs beautifully with this cake.
Fresh berries with a light cream add brightness and balance.
A small bowl of whipped yogurt with honey makes the whole plate feel extra comforting.
Serving and Presentation Tips
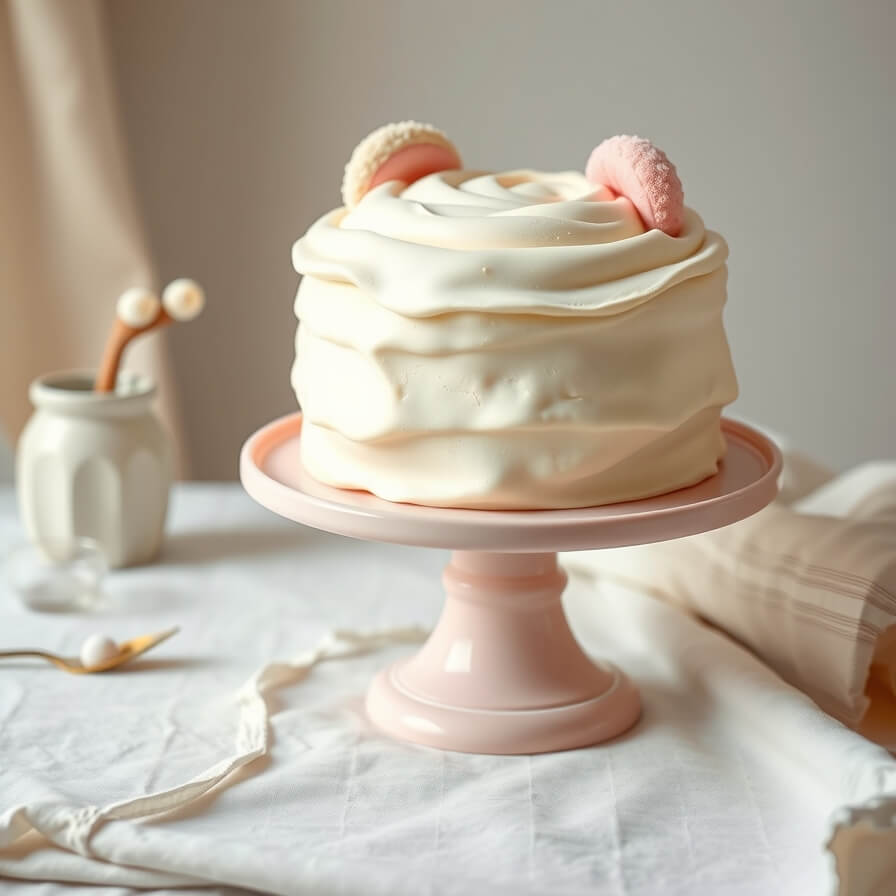
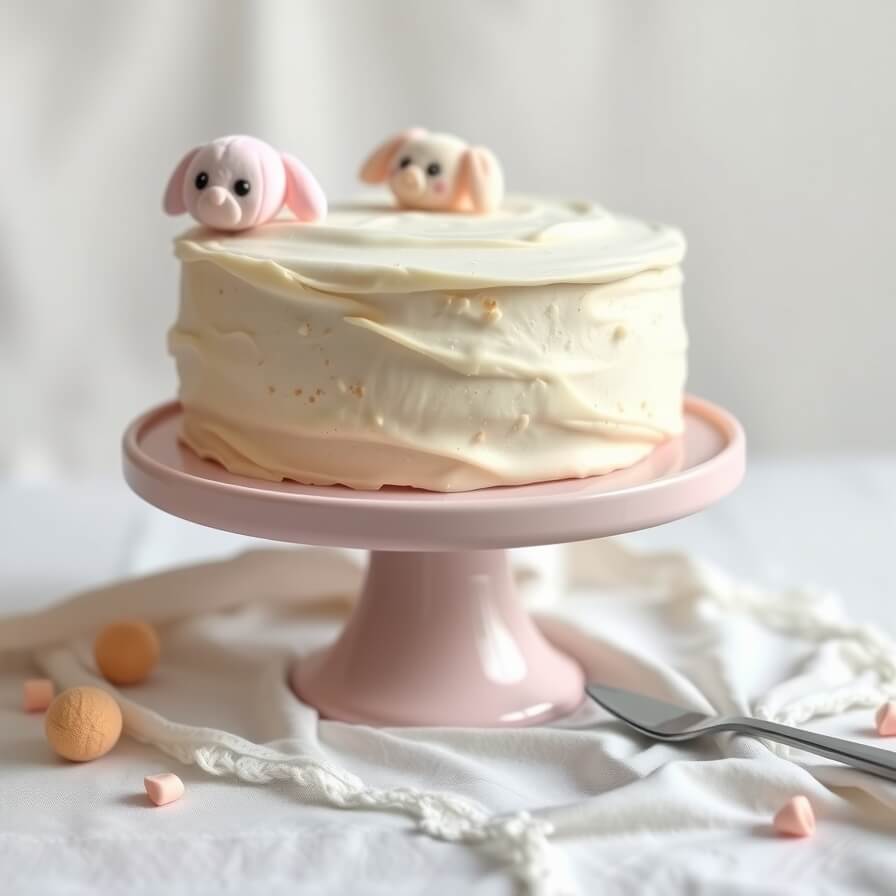
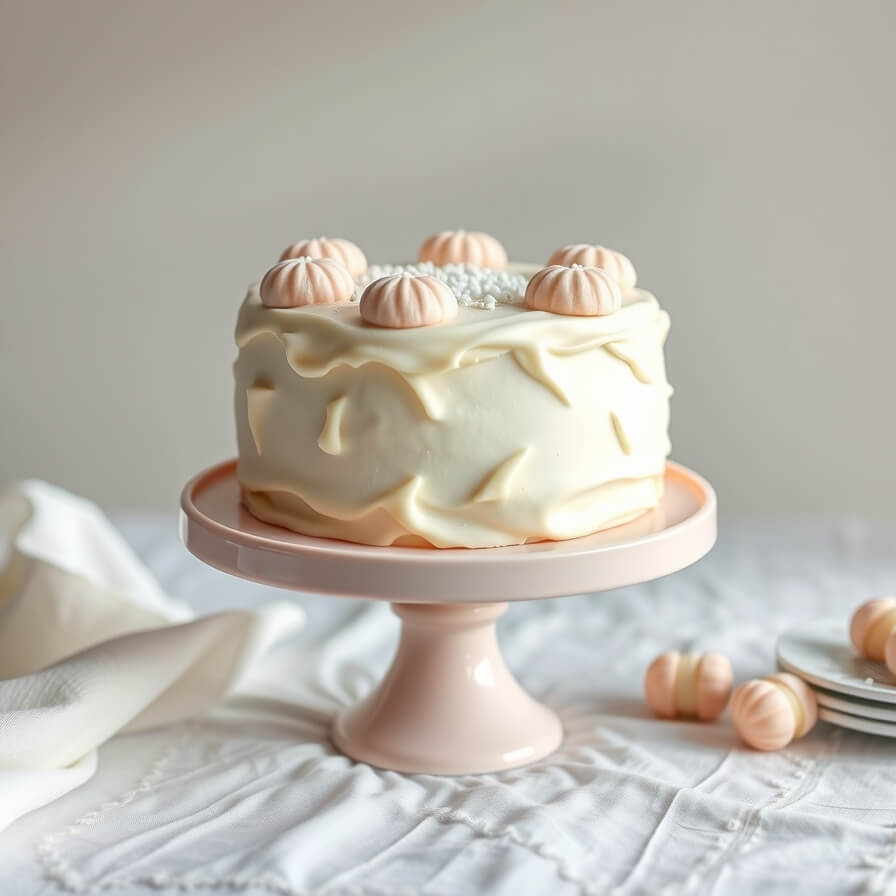
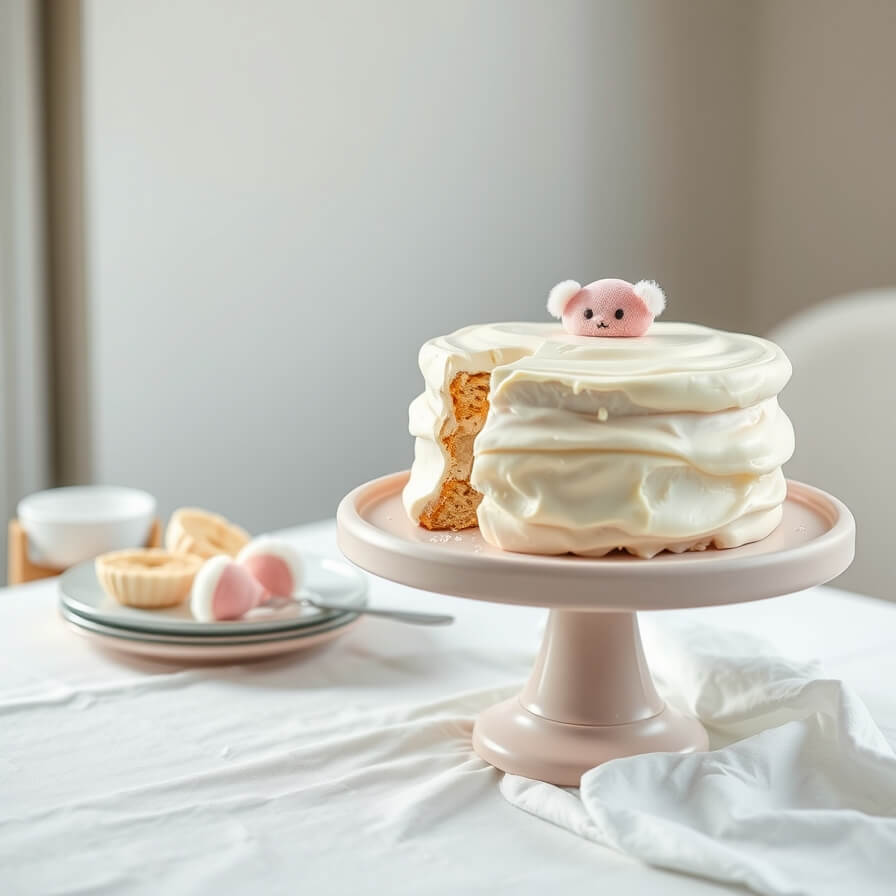
There’s something quietly magical about presenting a Jellycat cake. You don’t need sharp edges or flawless lines. In fact, the charm lives in the softness. I like to place the cake on a simple white or pastel stand so the colors feel calm and intentional, not busy.
When frosting, use gentle swooping motions instead of trying to smooth everything flat. A small offset spatula or even the back of a spoon works beautifully to create that plush, cloud-like texture. If you’re adding facial details or minimal decoration, keep them subtle. A tiny dot for eyes, a faint blush of pink, or a soft bow can be enough.
For gatherings, I usually slice the cake at the table. Watching people hesitate for a second because it’s “too cute” never gets old. Serve slices on small plates with extra space around them — this cake likes to breathe. If it’s a celebration, soft lighting and neutral linens make the cake feel even more special without stealing the spotlight.
Tips and Tricks to Make This Recipe Even Better
This cake rewards patience. One of the best things you can do is allow the cake layers to rest once baked. I often wrap them lightly and let them sit for a few hours or even overnight. The crumb settles, the moisture redistributes, and decorating becomes easier.
When it comes to frosting, temperature matters. If your kitchen is warm, chill the frosting briefly before applying. It helps keep those soft shapes intact. If it’s cold, let the frosting soften slightly so it spreads without tearing the cake.
Another small trick I swear by is crumb coating lightly and chilling the cake for 15 minutes before the final frosting. It’s not about perfection — it just gives you a cleaner base so the final layer looks intentional rather than messy.
And finally, trust your instincts. If the cake feels done, it probably is. Overbaking is the fastest way to lose that Jellycat softness.
Common Mistakes to Avoid
One common mistake is overmixing the batter. It’s tempting to keep going until everything looks perfectly smooth, but that’s when the cake loses its tenderness. Stop as soon as the ingredients come together.
Another issue is frosting a warm cake. I know waiting is hard, but warm cake will melt frosting and cause sliding layers. Give it time.
Using harsh or overly bright food coloring can also work against the look. Jellycat cakes are about softness, not boldness. Always add color gradually.
Lastly, don’t aim for bakery-level symmetry. This cake isn’t meant to be sharp or dramatic. Lean into its gentle personality.
How to Store It
Once frosted, the Jellycat cake should be stored in the refrigerator if your frosting contains dairy. I usually place it in a cake box or loosely tent it with plastic wrap to protect the surface without squishing it.
The cake stays moist for up to three days when chilled properly. Before serving, let it sit at room temperature for about 30 minutes. The texture softens, the flavors open up, and it tastes freshly made again.
If you need to store unfrosted layers, wrap them well and keep them at room temperature for a day or refrigerate for up to three days. You can also freeze the layers for longer storage, which makes future decorating even easier.
Frequently Asked Questions
Can I make this Jellycat cake ahead of time?
Yes, and it actually benefits from it. Bake the layers a day early and frost the next day for best results.
Is this cake very sweet?
No, it’s balanced. The sweetness is gentle, which is why both kids and adults enjoy it.
Can I make this cake without food coloring?
Absolutely. A plain cream or vanilla-colored cake still looks beautiful and very Jellycat-inspired.
What pan size works best for this recipe?
Two or three round pans work well, depending on how tall you want the cake.
Can this cake be used for themed parties?
Yes. That’s one of its strengths. You can adapt colors and small details without changing the recipe.

Jellycat Cake Recipe
- Total Time: 1 hour 10 minutes
- Yield: 10–12 1x
- Diet: Vegetarian
Description
This Jellycat cake is a soft, whimsical dessert designed to bring comfort and joy. Inspired by the plush, gentle feel of Jellycat toys, it features a tender vanilla sponge and a creamy frosting that spreads like a dream. The cake isn’t about sharp edges or dramatic height — it’s about softness, warmth, and a sense of nostalgia. Perfect for birthdays, baby showers, or cozy family gatherings, this cake invites you to slow down and enjoy the process. It’s forgiving, adaptable, and deeply satisfying to bake and share. If you’re looking for a cake that feels as good as it tastes, this one belongs in your kitchen.
Ingredients
- All-purpose flour
- Unsalted butter
- Granulated sugar
- Eggs
- Whole milk
- Baking powder
- Salt
- Vanilla extract
- Powdered sugar
- Cream or milk for frosting
Instructions
- Preheat oven and prepare cake pans.
- Cream butter and sugar until light and fluffy.
- Add eggs gradually, mixing gently.
- Combine dry ingredients separately.
- Alternate adding dry ingredients and milk to the batter.
- Bake until just done and cool completely.
- Prepare frosting until soft and spreadable.
- Assemble and frost the cake with gentle strokes.
Notes
- For the best texture, allow cake layers to rest before decorating. Use soft, pastel tones if coloring the frosting, and avoid overworking the surface.
- Prep Time: 30 minutes
- Cook Time: 40 minutes
- Category: Dessert
- Method: Baking
- Cuisine: Western
Nutrition
- Serving Size: 10–12
- Calories: 420
- Sugar: 32g
- Sodium: 210mg
- Fat: 22g
- Saturated Fat: 13g
- Unsaturated Fat: 8g
- Trans Fat: 0g
- Carbohydrates: 52g
- Fiber: 1g
- Protein: 6g
- Cholesterol: 95mg