Ice Cream Sandwich Cake (Just 5 Ingredients)
I’ll never forget that sweltering July afternoon a few summers ago when my kids begged me for something cold, sweet, and utterly indulgent. The freezer was packed with our favorite ice cream sandwiches—chocolate wafers hugging creamy vanilla centers. I had a fleeting thought: what if I could turn these frozen treats into a full-on dessert for the whole family? That’s how this ice cream sandwich cake came to life.
It wasn’t a meticulously planned recipe at first. In fact, the first attempt was a bit of a mess. I stacked the sandwiches unevenly, and the ice cream melted faster than I expected. But as we scraped the melting ice cream into bowls and laughed over the “deconstructed cake,” an idea struck. With a little patience, proper layering, and a touch of chocolate magic, this dessert transformed into a showstopper that’s as much about fun as it is about flavor.
I’ve made it countless times since, tweaking ingredients and techniques to get the perfect balance of creamy, chocolatey, and sweet. Every bite has the crunch of cookie, the smoothness of ice cream, and that little touch of nostalgia that reminds me of long summer days in our backyard. It’s deceptively simple, but when you serve it, expect oohs and ahhs from everyone around the table.
Ingredients in Context
What I love about this cake is that it’s flexible without losing its magic. At its heart, you need three things: ice cream sandwiches, your favorite ice cream, and some chocolate or fudge for drizzling. But let’s break it down in a way that feels more like chatting over the counter than reading a list.
Ice Cream Sandwiches: I usually go for classic chocolate wafer with vanilla ice cream, but feel free to experiment. Mint chocolate, cookies and cream, or even peanut butter flavored sandwiches can change the flavor profile entirely. Just remember, sturdier cookies hold up better when layering.
Ice Cream for the Filling: You don’t need fancy flavors here. Vanilla, chocolate, or strawberry work perfectly. Sometimes I like to swirl in a caramel ribbon or even chocolate chips before layering. Pro tip: slightly softened ice cream spreads more easily but avoid letting it melt completely or the layers will slide.
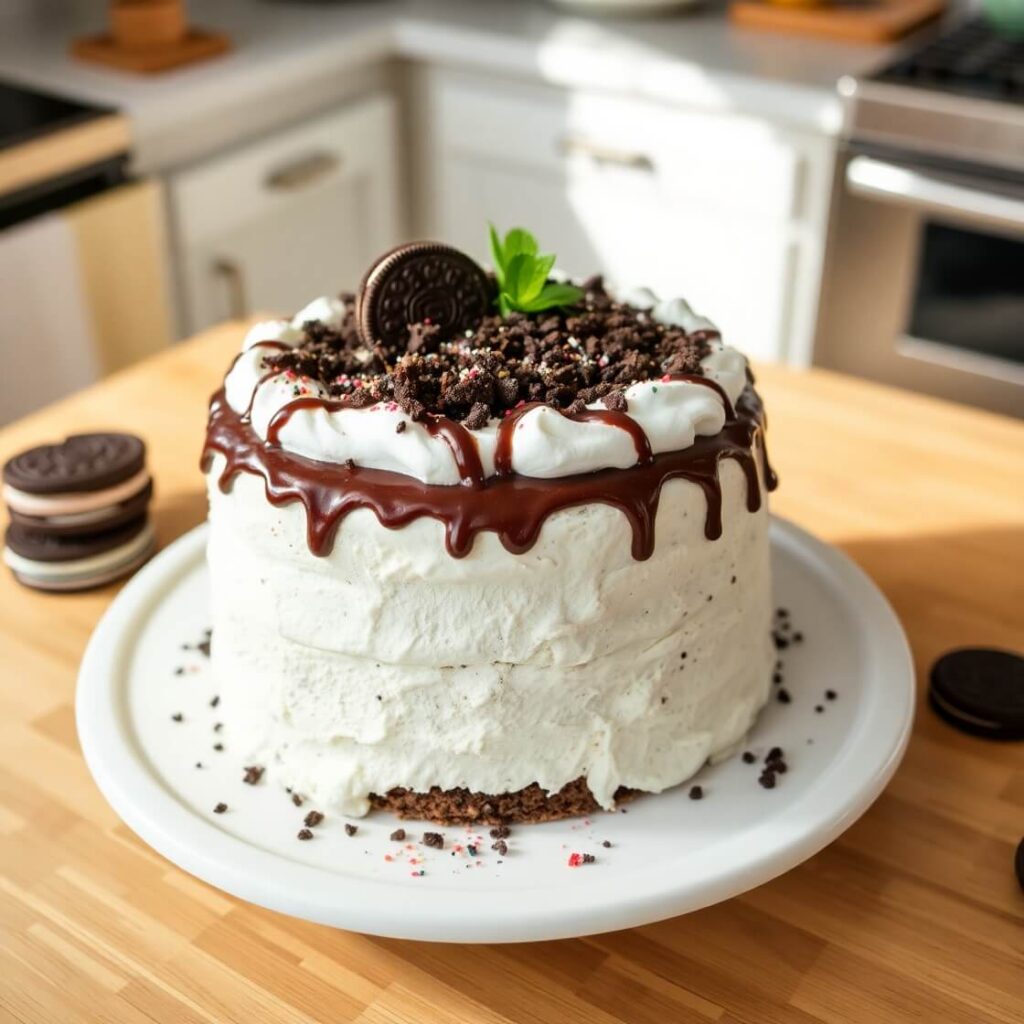
Chocolate or Fudge Topping: This is where the cake really shines. A rich fudge sauce or melted chocolate over the top creates a beautiful glossy finish and helps hold everything together. I’ve tried milk chocolate, dark chocolate, and even a peanut butter-chocolate combo. Each version adds a slightly different flavor nuance.
Optional Mix-Ins: Sprinkles, crushed nuts, or mini candies tucked between layers give a fun crunch. My kids insist on rainbow sprinkles every time. It’s messy, but it’s part of the charm.
Pan Size and Type: I use a 9×13-inch glass baking dish—it’s easy to layer, freezes well, and you can serve straight from the dish. Aluminum works too, especially if you want to wrap the cake for a picnic or potluck.
How to Make Ice Cream Sandwich Cake
Here’s how I usually build the cake, with sensory cues to guide you. Imagine each layer coming together like a little ice cream sculpture.
Step 1: Prep the Pan
Line your 9×13-inch pan with parchment paper or lightly grease it. This ensures you can lift the cake out easily if needed.
Step 2: Layer the Ice Cream Sandwiches
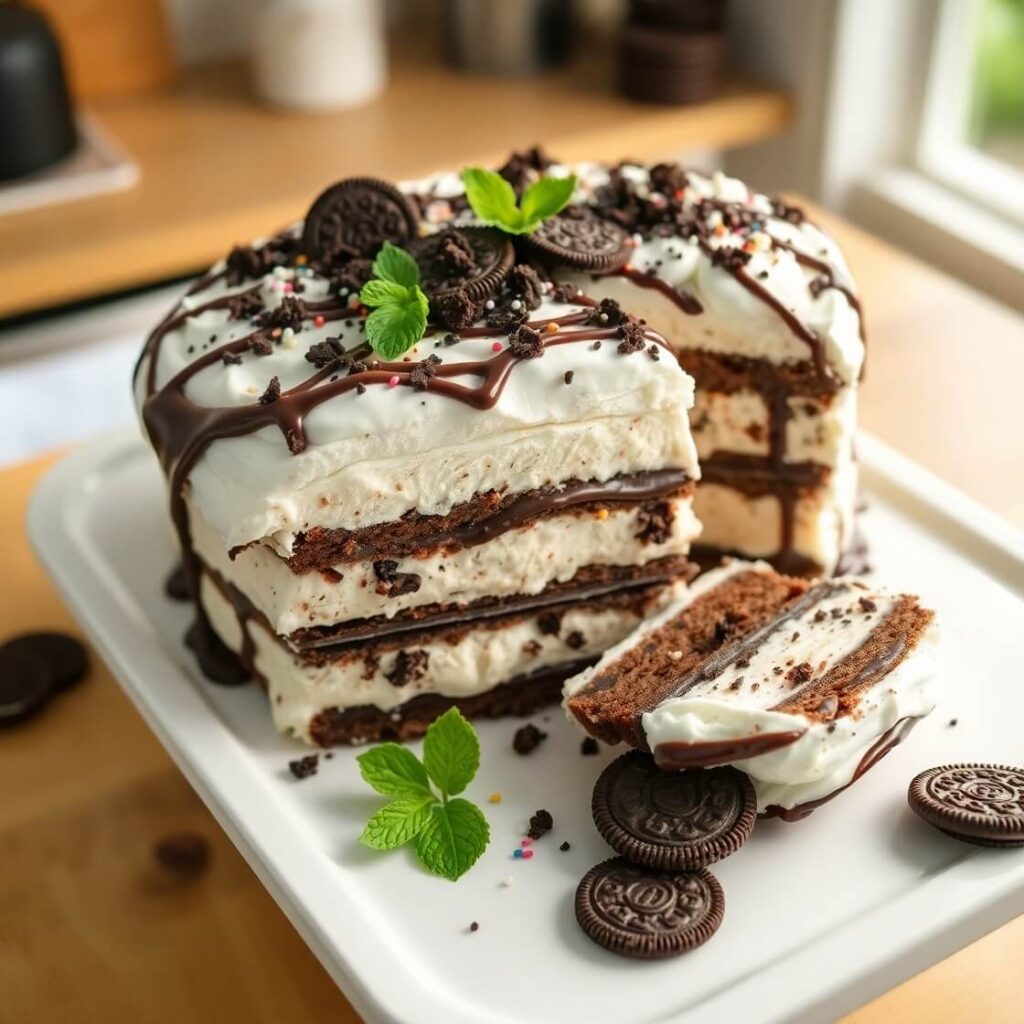
Arrange sandwiches in a single layer, snug against each other. If needed, trim edges slightly so they fit. The visual should be a neat rectangle of chocolate cookie with ice cream peeking between layers.
Step 3: Add a Layer of Ice Cream
Scoop softened ice cream on top of the first sandwich layer. Spread gently with a spatula, covering all edges. You want an even layer about 1/2 inch thick. The ice cream should be soft enough to spread but not melting into soup.
Step 4: Repeat Layers
Place a second layer of ice cream sandwiches on top, followed by another layer of ice cream. The number of layers depends on how tall you want the cake—two sandwich layers and two ice cream layers are usually perfect for my family.
Step 5: Drizzle Chocolate or Fudge
Warm your chocolate or fudge sauce slightly so it’s pourable but not hot. Drizzle generously over the top layer. You can swirl with a spoon for a marbled effect. The smell here is heavenly—sweet chocolate mingling with cold ice cream.
Step 6: Add Toppings (Optional)
Sprinkles, crushed cookies, or nuts can be pressed lightly into the top. This step makes the cake fun for kids and adds texture.
Step 7: Freeze
Cover the cake with plastic wrap and freeze for at least 4 hours, ideally overnight. This step is crucial for slicing cleanly.
Step 8: Slice and Serve
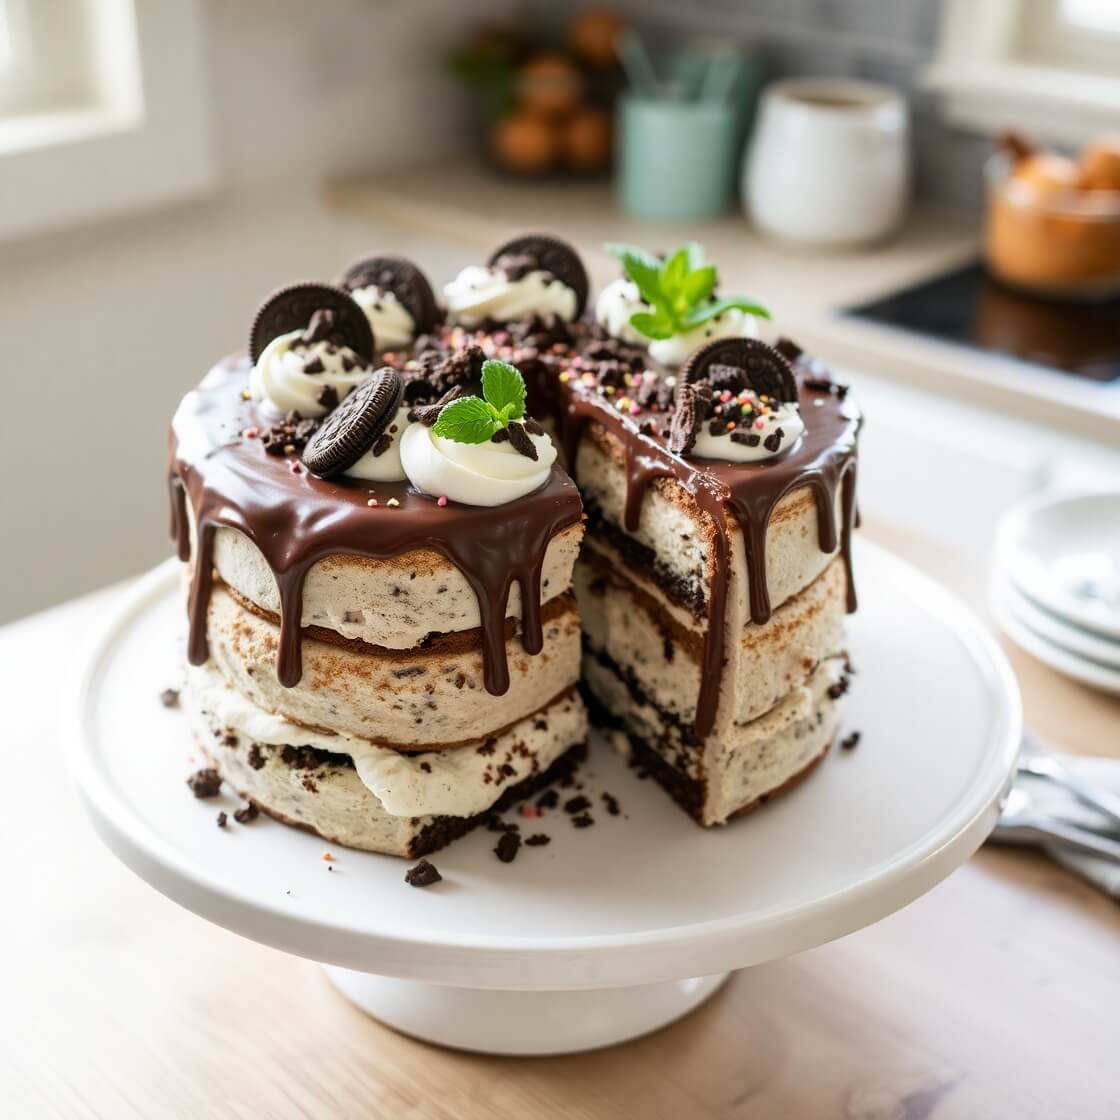
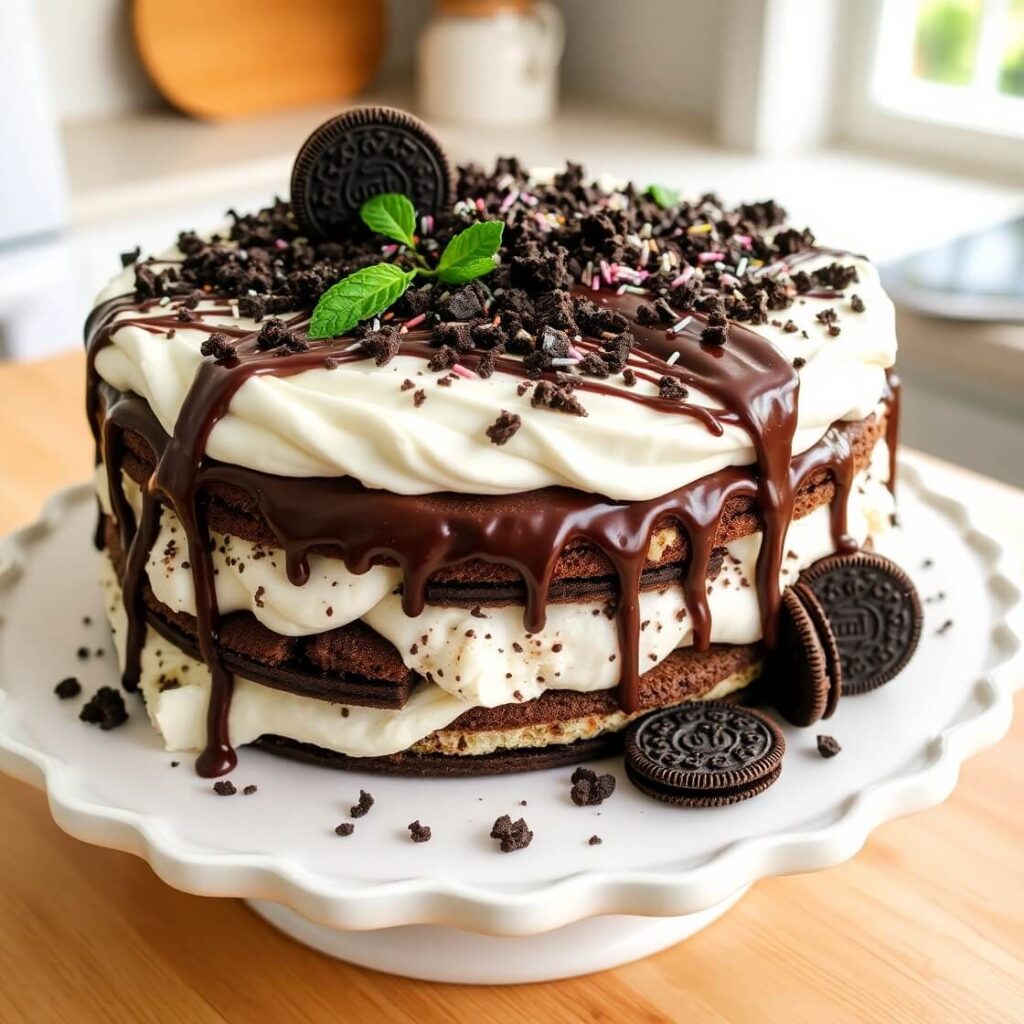
Remove from freezer 5–10 minutes before serving to make slicing easier. Use a sharp knife, warmed under hot water, for perfect pieces. Watch the delight on faces as the layers reveal themselves—chocolate, ice cream, cookie, all in one bite.
Love the Layers
I can’t emphasize enough how the layering elevates this dessert. It’s not just about aesthetics—it’s about the eating experience. Each bite is a miniature adventure: chocolate cookie crunch, creamy ice cream, sweet drizzle, and sometimes a sprinkle surprise. It’s like an ice cream sundae, cake, and cookie all rolled into one frozen masterpiece.
Small Cooking Notes That Make a Big Difference
- Always keep sandwiches cold until the moment you layer. Soft cookies or melting ice cream can ruin the structure.
- When spreading ice cream, a slightly warm spatula prevents tearing or uneven layers.
- Chocolate drizzle should be pourable but not hot; hot chocolate can melt your top layer.
- Cover well before freezing to prevent freezer burn, especially if freezing overnight.
A small anecdote: the first time I tried chocolate chips between the layers, I thought the crunch would add texture. But some chips sank and froze mid-layer. I’ve since learned to sprinkle them lightly over the top of softened ice cream instead.
Serving Ideas That Impress
One of my favorite parts about this ice cream sandwich cake is how versatile it is on the table. You can serve it straight from the pan, letting each guest slice their piece, or transfer it carefully to a platter for a slightly more polished look. I like to place a few fresh berries around the edges, a light dusting of cocoa powder, or a drizzle of extra chocolate sauce just before serving. It adds a pop of color and makes the dessert feel extra special.
For kid-friendly gatherings, I sometimes set up a small “topping station” with sprinkles, crushed cookies, mini chocolate chips, or even a little whipped cream. Each child can customize their slice, and it becomes part of the fun rather than just eating dessert. Adults appreciate a more refined presentation—perhaps adding a sprinkle of sea salt over the chocolate drizzle or pairing slices with espresso or a fruity cocktail.
You can also serve it as a casual after-dinner treat by simply placing a slice on a chilled plate. The layers look beautiful, and the cake slices cleanly if slightly thawed—about 5–10 minutes at room temperature. I’ve found that letting it sit too long makes the ice cream too soft to serve neatly, so timing is key.
Print
Ice Cream Sandwich Cake
- Total Time: 4 hours 20 minutes (including freeze time)
- Yield: 12 1x
- Diet: Vegetarian
Description
This no-bake ice cream sandwich cake is a dreamy, layered dessert that combines the nostalgic flavor of classic ice cream sandwiches with whipped topping, fudge, and cookie crumbles. It’s rich, creamy, and takes just 15 minutes to assemble—perfect for summer cookouts, birthdays, or any time you want a low-effort, high-impact treat. It freezes beautifully and can be customized with your favorite toppings, from sprinkles to caramel drizzle. You’ll come back to this recipe again and again.
Ingredients
- 12–16 classic ice cream sandwiches
- 1 (16 oz) tub whipped topping, thawed
- 1 cup chocolate fudge sauce (slightly warmed)
- 1 cup crushed cookies (Oreos or similar)
- Optional: sprinkles, mini chocolate chips, chopped candy for topping
Instructions
- Line a 9×13 baking dish with foil or parchment.
- Unwrap 6–8 sandwiches and lay them flat in the bottom of the dish. Trim to fit.
- Spread half the fudge sauce over the sandwiches.
- Top with half the whipped topping and a sprinkle of crushed cookies.
- Add another layer of ice cream sandwiches.
- Spread remaining whipped topping evenly over the top.
- Garnish with extra fudge, sprinkles, or cookie crumbs.
- Freeze for at least 4 hours, ideally overnight.
- Slice with a warm knife and serve immediately.
Notes
- Let the whipped topping soften slightly before spreading to avoid tearing the sandwiches. For cleaner cuts, run a knife under hot water between slices. Customize with caramel, peanut butter, or different candy mix-ins to suit your taste.
- Prep Time: 20 minutes
- Cook Time: 0 minutes
- Category: Dessert
- Method: freezer, No-Bake
- Cuisine: American
Nutrition
- Serving Size: 12
- Calories: 290
- Sugar: 22g
- Sodium: 180mg
- Fat: 13g
- Saturated Fat: 8g
- Unsaturated Fat: 4g
- Trans Fat: 0g
- Carbohydrates: 36g
- Fiber: 1g
- Protein: 3g
- Cholesterol: 15mg