Fudgy Chocolate Cake Recipe
It started as one of those Sunday afternoons when I was sure I had everything under control — the butter softening, the oven preheating, and a craving that could only be satisfied by something rich, dark, and unapologetically chocolatey. I’d promised my niece we’d bake “a cake that feels like a brownie but looks like a dream,” her words, not mine.
But as the smell of cocoa filled the kitchen, something went wrong. I pulled the pan out too soon. The middle sagged like a tiny chocolate crater. I remember the sinking feeling in my chest matching the cake’s center. I’d underbaked it — and my niece’s face said everything.
Still, curiosity got the better of us. We cut into the sunken center, and what happened next changed my idea of “failure” forever. Inside wasn’t raw batter — it was pure, molten, fudgy bliss. The edges had that delicate crumb, the center was glossy and dense like truffle filling. We topped it with a cloud of whipped cream, and it was heaven.
That accident became this recipe — the fudgy chocolate cake I now make for every birthday, heartbreak, and celebration in between.
Pro Notes & Fixes from That Fateful Afternoon
If I could go back and tell my past self one thing, it would be: Don’t fear the gooey middle. That’s where the magic happens. The beauty of a fudgy chocolate cake lies in its balance between slightly underbaked and perfectly set.
Here’s what I learned (and how you can nail it every single time):
1. Temperature is everything.
If your oven runs hot, the edges will overcook while the center stays liquid. Use an oven thermometer — I learned this the hard way. My “350°F” oven was actually closer to 385°F, which explains the crispy rims that first day.
2. Quality chocolate makes or breaks it.
You can’t fake richness. Use at least 70% dark chocolate — I love mixing half bittersweet chocolate chips with half high-quality baking chocolate for depth.
3. Don’t overmix.
Once you add the flour, stir gently. Overmixing activates gluten, turning a fudgy cake into a chewy one. Think folding, not stirring.
4. Let it rest.
When you pull it from the oven, it’s tempting to slice right in — I get it. But give it 20 minutes to cool. The heat continues to set the texture into that perfect dense-yet-creamy bite.
5. The fudginess test.
A toothpick should come out with moist crumbs, not clean. Clean means overbaked. Gooey streaks mean you’re just right.
That day taught me that baking isn’t about control — it’s about reading the signs, trusting the smells, and embracing a little imperfection.
Ingredients in Context
Every ingredient in this cake has a purpose. Here’s why I choose each one and what to look for when you’re shopping:
Dark Chocolate (70% or higher) – The heart and soul of this recipe. It brings intensity and richness. If you prefer a milder flavor, use half semi-sweet, half dark. Avoid milk chocolate — it’s too sweet and lacks structure.
Unsalted Butter – Butter adds silkiness and shine. I use European-style butter for its higher fat content (around 82%), which makes the crumb velvety.
Cocoa Powder – Use Dutch-process cocoa if you can. It gives a deeper color and smoother taste than natural cocoa. Sift it well to prevent clumps.
Granulated Sugar & Brown Sugar – The mix of both creates balance. Brown sugar adds moisture and a hint of caramel undertone.
Eggs – Four large eggs create that dense, rich body. Room temperature eggs incorporate better and give you that glossy batter.
Flour – Only a small amount (about ¾ cup) — just enough to hold the cake together without losing the fudginess.
Salt – Don’t skip it. A pinch sharpens the chocolate flavor and cuts sweetness beautifully.
Espresso Powder (optional but magical) – Coffee amplifies chocolate. It won’t make your cake taste like espresso, just more chocolatey.
Vanilla Extract – Adds warmth and rounds out the flavors.
Heavy Cream or Ganache Topping (optional) – For a glossy finish, pour a thin layer of warm ganache over the cooled cake. It’s optional, but if you love decadence, it’s worth it.
When you line these up on the counter, you can already tell this isn’t a “light” cake — it’s a celebration cake. The kind you eat slowly, fork in hand, with silence around the table because everyone’s too busy enjoying it.
The Secret Behind Its Flavor
The real secret to this fudgy chocolate cake isn’t in any fancy technique — it’s in layering flavor and texture.
Most chocolate cakes rely on cocoa alone, but I combine melted dark chocolate with cocoa powder. That double-hit of chocolate delivers depth — one gives you body, the other adds aroma and color.
Then there’s the fat factor. Butter adds richness, but it’s the eggs that transform the batter. Beating the eggs with sugar until pale and thick traps air, giving just enough lift to keep the cake from being heavy. It’s the reason this cake feels silky instead of dense like fudge.
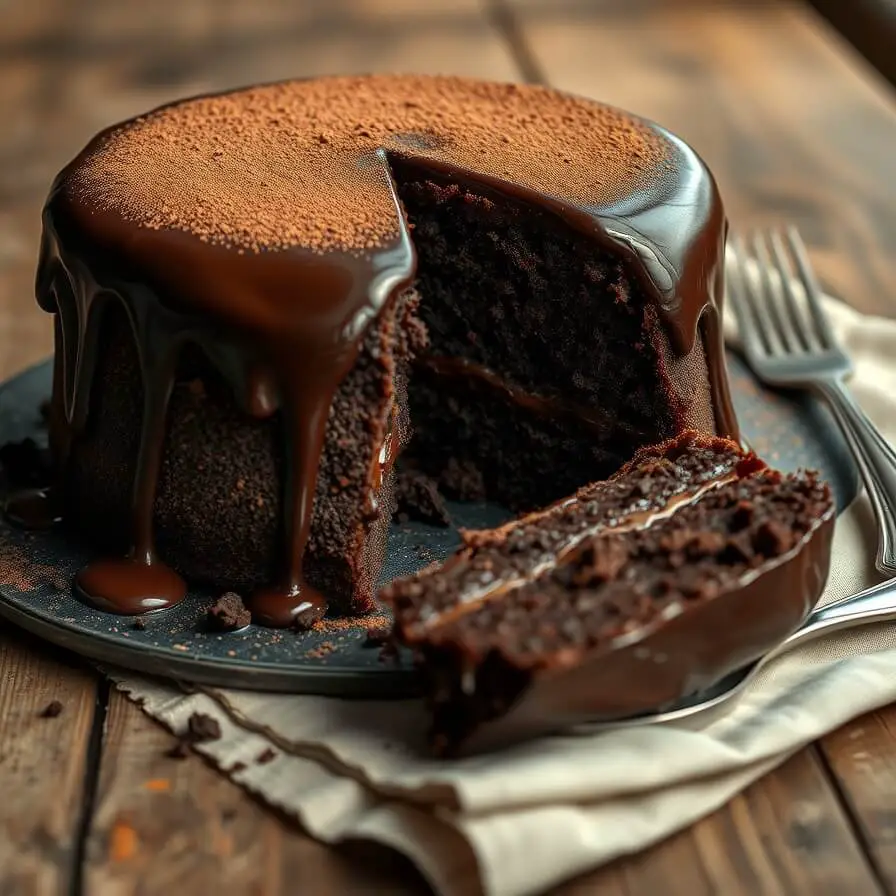
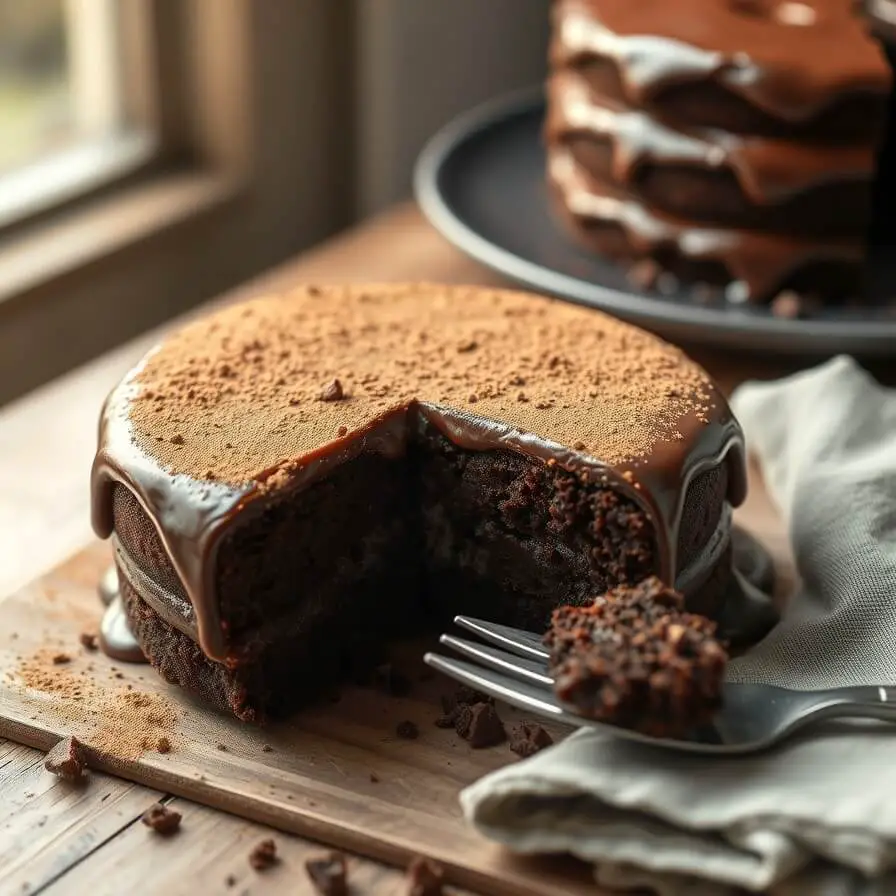
Finally, baking just until barely set — the “wobble zone.” It takes restraint to pull the cake when the center jiggles slightly. But that’s the difference between dry and divine. As it cools, that molten middle firms into a luscious, truffle-like core.
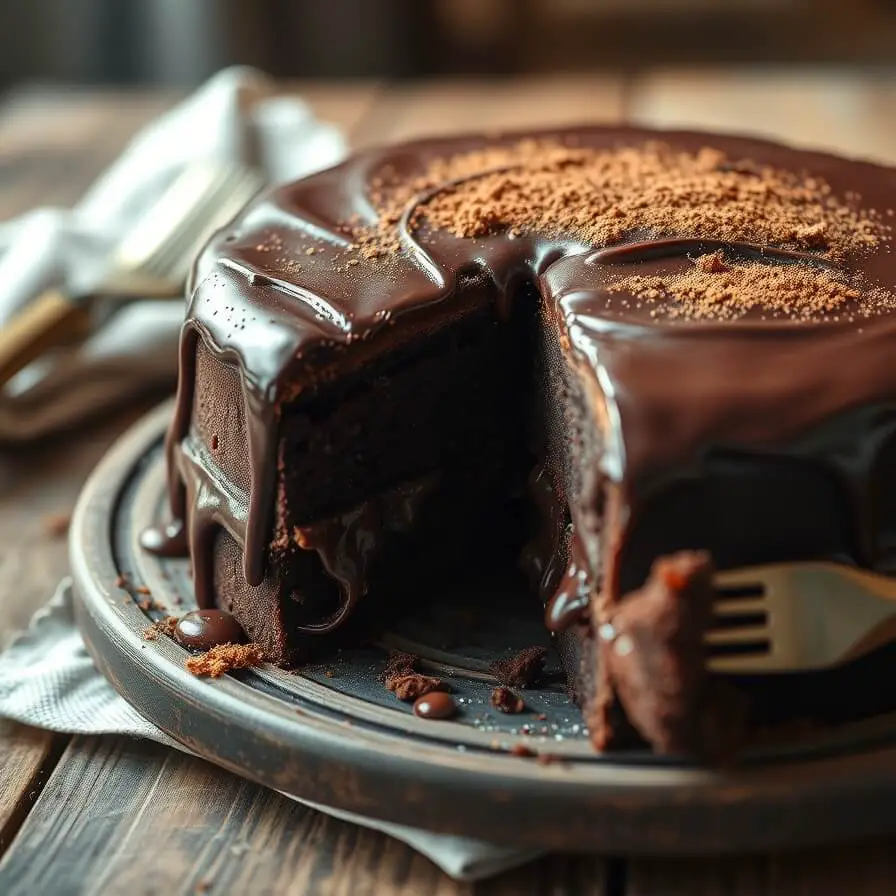
Every bite carries that signature balance — the crisp edge, the chewy outer crumb, and the luxurious fudgy center.
Step-by-Step: How to Make My Fudgy Chocolate Cake
This is the flow I follow every time — simple, sensory, and forgiving.
Step 1: Prep the foundation.
Preheat your oven to 350°F (175°C). Line an 8-inch round pan with parchment paper and butter the sides. This prevents sticking and ensures a smooth release later.
Step 2: Melt the chocolate and butter.
In a heatproof bowl over simmering water (double boiler style), melt 200g dark chocolate and ¾ cup butter together. Stir gently until glossy and combined. The smell alone is intoxicating. Remove from heat and let it cool slightly.
Step 3: Whisk the eggs and sugar.
In a large bowl, whisk 1 cup granulated sugar and ½ cup brown sugar with 4 eggs until pale and slightly thick — about 2–3 minutes by hand or 1 minute with a mixer. You’re looking for a smooth, slightly airy texture.
Step 4: Combine wet ingredients.
Slowly pour the melted chocolate mixture into the eggs while whisking constantly to prevent curdling. Add 1 teaspoon vanilla extract and 1 teaspoon espresso powder (optional).
Step 5: Add dry ingredients.
Sift together ¾ cup all-purpose flour, ½ cup Dutch-process cocoa powder, and ¼ teaspoon salt. Gently fold this into the wet mixture using a spatula — stop as soon as you no longer see dry streaks.
Step 6: Bake.
Pour batter into your prepared pan. Bake for 28–32 minutes. The top should form a shiny crust, and the center should jiggle slightly when you shake the pan. That’s your fudgy sweet spot.
Step 7: Cool and release.
Let it cool in the pan for 15–20 minutes, then run a knife along the edge and lift it out gently. Don’t rush — this cake is delicate when warm.
Step 8: Optional ganache finish.
Heat ½ cup heavy cream until steaming, pour over 100g chopped chocolate, and whisk into a smooth glaze. Spread or drizzle it over the cooled cake for extra richness.
Step 9: Serve.
Dust with cocoa powder, top with berries, or serve with vanilla ice cream. My niece swears by a dollop of whipped cream and a sprinkle of sea salt.
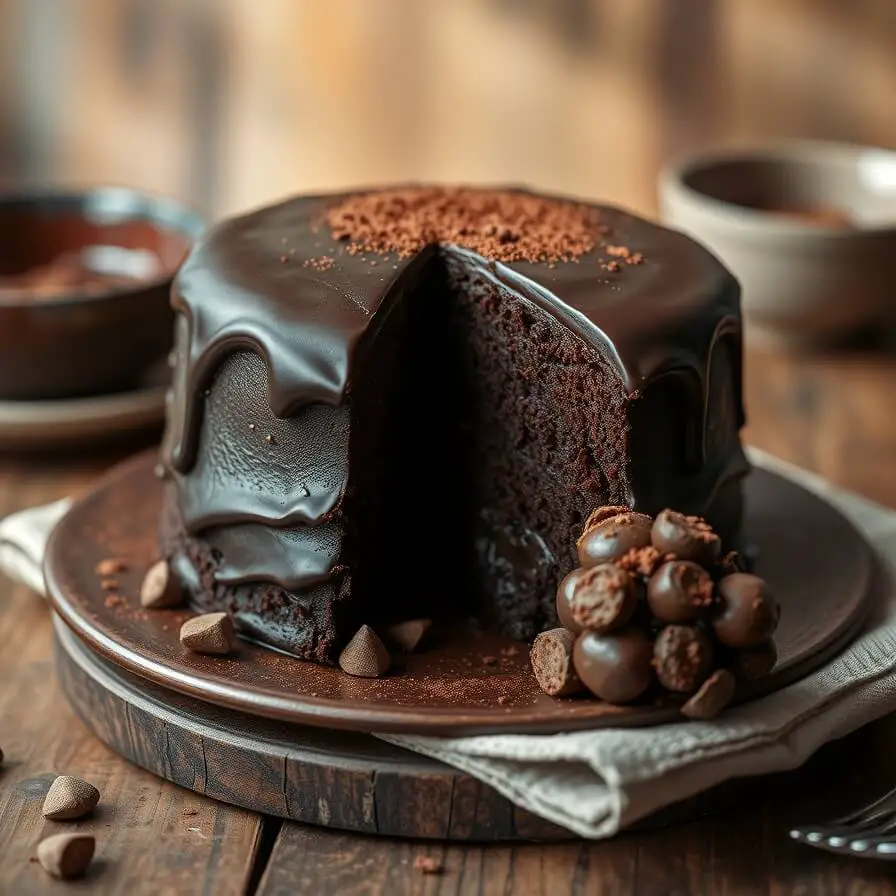
The first slice always breaks a little — and that’s how you know it’s right. A slightly cracked top, soft edges, and that dense, fudgy middle. It’s the kind of dessert that demands you close your eyes for the first bite.
Serving & Presentation Tips
The first time I served this cake at a dinner party, I remember the collective pause at the table. You know that moment when everyone takes their first bite and no one says a word because they’re too busy savoring it? That’s what this cake does.
It doesn’t need much — just a simple presentation that lets the fudginess speak for itself.
If you’re going for elegance, a light dusting of cocoa powder or powdered sugar adds a beautiful contrast against the dark, glossy surface. For a rustic touch, serve it straight from the pan with a spoonful of whipped cream melting into the cracks.
When I want to make it extra special, I drizzle a thin stream of ganache down the sides so it barely pools at the bottom — it’s dramatic without being fussy.
And here’s a little secret: sea salt flakes. Just a pinch before serving takes this cake from rich to unforgettable. That salty-sweet hit enhances every layer of chocolate.
If you’re serving it warm, pair it with cold vanilla ice cream — the temperature contrast makes the chocolate flavor bloom even more. But if you chill it overnight, you’ll get that dense, truffle-like bite — perfect for slicing cleanly and serving with espresso or red wine.
Pro Notes & Common Mistakes to Avoid
Over the years, I’ve made this cake dozens of times — for birthdays, rainy afternoons, even as a midnight craving fix. And yes, I’ve made every mistake possible along the way. So here’s my honest list of lessons learned that’ll help you avoid mine.
1. Don’t overbake — trust the wobble.
The hardest part is knowing when to stop. The center should look slightly unset when you take it out. If it looks firm, it’s already overdone. Remember, it continues cooking as it cools.
2. Resist the urge to slice too soon.
Fresh out of the oven, the texture is too molten to hold its shape. Let it cool for at least 20 minutes before cutting — or chill for an hour if you want those picture-perfect slices.
3. Avoid cheap chocolate.
This recipe’s flavor depends entirely on the quality of your chocolate. Lower-end chocolate often contains extra sugar or fillers that dull the taste and alter texture. Splurge a little — it’s worth every bite.
4. Measure flour carefully.
Too much flour turns fudgy into cakey. Always spoon and level your flour instead of scooping directly from the bag.
5. Watch your oven rack.
Bake in the center of the oven — too high and the top burns before the middle cooks; too low and it won’t rise properly.
Every cake tells you a little story if you pay attention — the way it cracks, the way it smells, the color of its crust. Once you start noticing, you’ll rarely go wrong.
Storage & Make-Ahead Tips
This cake is surprisingly forgiving — in fact, it’s even better the next day. The flavors deepen as it sits, making it one of those rare desserts that actually improve overnight.
Room Temperature:
If your kitchen isn’t too warm, you can keep the cake covered at room temperature for up to 2 days. I usually store mine under a glass dome to keep it soft.
Refrigerator:
For longer storage, wrap it tightly and refrigerate for up to 5 days. Bring it to room temperature before serving so the texture returns to that perfect fudginess.
Freezer:
Yes, it freezes beautifully. Slice the cake, wrap each piece in plastic wrap, and store in an airtight container for up to 2 months. Thaw overnight in the fridge or let it sit on the counter for an hour before serving.
Make Ahead:
You can bake this cake a day in advance and store it covered. In fact, I recommend it — the fudginess sets and the flavor deepens overnight.
Pro tip: Warm a slice in the microwave for 10–15 seconds before serving to bring back that molten magic.
FAQs About Fudgy Chocolate Cake
Q: How do I make this gluten-free?
Replace the all-purpose flour with a 1:1 gluten-free baking blend (Bob’s Red Mill or King Arthur work great). The texture remains dense and rich.
Q: Can I make this cake dairy-free?
Absolutely. Substitute butter with coconut oil or a vegan butter alternative, and use dairy-free dark chocolate. Skip the ganache or make it with coconut cream instead of heavy cream.
Q: My cake cracked on top — what went wrong?
Actually, that’s not a mistake! The cracked top is a signature of a good fudgy cake. It means the outer layer has formed a delicate crust while the inside stays molten.
Q: Can I bake it in a different pan size?
Yes, but adjust the time. For a 9-inch pan, reduce baking time to 25 minutes. For smaller pans or ramekins, check around 20 minutes for individual servings.
Q: How do I get clean slices?
Use a sharp knife dipped in hot water, wipe between slices, and cut slowly. It sounds extra, but it keeps the edges beautiful and smooth.

Fudgy Chocolate Cake Recipe
- Total Time: 45 minutes
- Yield: 8 1x
- Diet: Vegetarian
Description
A deeply rich, indulgent chocolate cake with a molten center and crisp edges — perfect for when you crave something between a brownie and a truffle. This one-bowl wonder is simple, elegant, and dangerously delicious.
Ingredients
- 200g dark chocolate (70% cocoa or higher), chopped
- ¾ cup unsalted butter
- 1 cup granulated sugar
- ½ cup brown sugar
- 4 large eggs, room temperature
- 1 teaspoon vanilla extract
- 1 teaspoon espresso powder (optional)
- ¾ cup all-purpose flour
- ½ cup Dutch-process cocoa powder
- ¼ teaspoon salt
- (Optional) ½ cup heavy cream + 100g dark chocolate for ganache
Instructions
- Preheat oven to 350°F (175°C). Line an 8-inch round pan with parchment and butter the sides.
- Melt chocolate and butter over a double boiler until smooth. Let cool slightly.
- In a large bowl, whisk eggs, granulated sugar, and brown sugar until pale and slightly thick.
- Slowly whisk in melted chocolate mixture. Stir in vanilla and espresso powder.
- Sift together flour, cocoa powder, and salt. Gently fold into the wet ingredients just until combined.
- Pour into pan and bake 28–32 minutes, until the edges are set but the center still jiggles slightly.
- Cool in the pan for 15–20 minutes before slicing.
- For the ganache, heat heavy cream, pour over chopped chocolate, whisk smooth, and drizzle over cooled cake.
Notes
- Use high-quality dark chocolate for best flavor.
- A slightly cracked top means success — that’s your fudgy crust forming.
- For a softer texture, serve warm. For a dense truffle-like version, chill overnight.
- Prep Time: 15 minutes
- Cook Time: 30 minutes
- Category: Dessert
- Method: Baking
- Cuisine: American
Nutrition
- Serving Size: 8
- Calories: 460
- Sugar: 36g
- Sodium: 90mg
- Fat: 30g
- Saturated Fat: 18g
- Unsaturated Fat: 10g
- Trans Fat: 0g
- Carbohydrates: 45g
- Fiber: 4g
- Protein: 6g
- Cholesterol: 125mg