45+ Dessert Charcuterie Board Ideas for Your Next Gathering

Creating a dessert charcuterie board is a fun and creative way to satisfy any sweet tooth! From chocolate-covered strawberries to a variety of cookies and candies, there are endless options to assemble a visually stunning and delicious spread. Here are over 45 unique ideas to inspire your next sweet gathering!
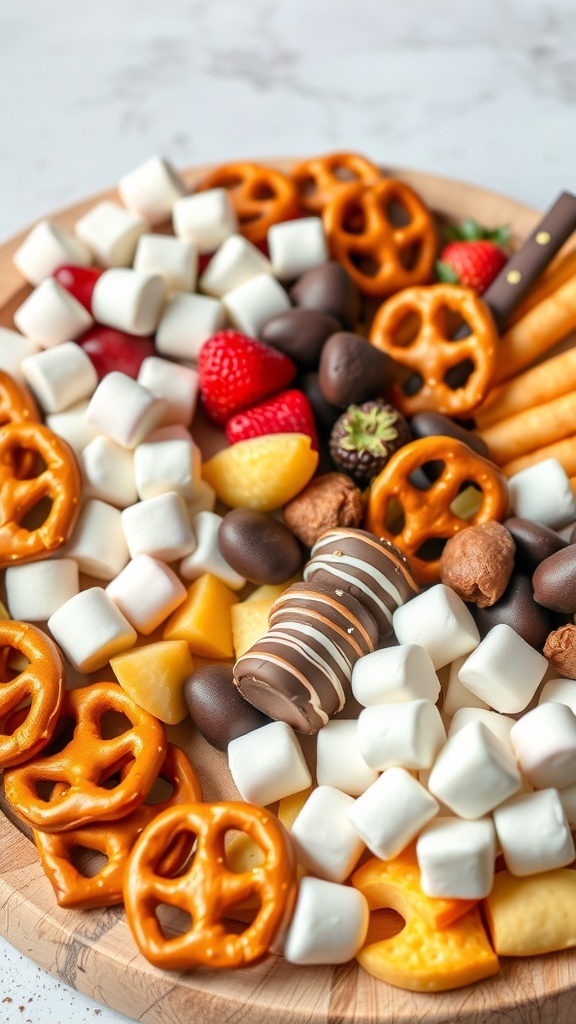
Decadent Chocolate Indulgence
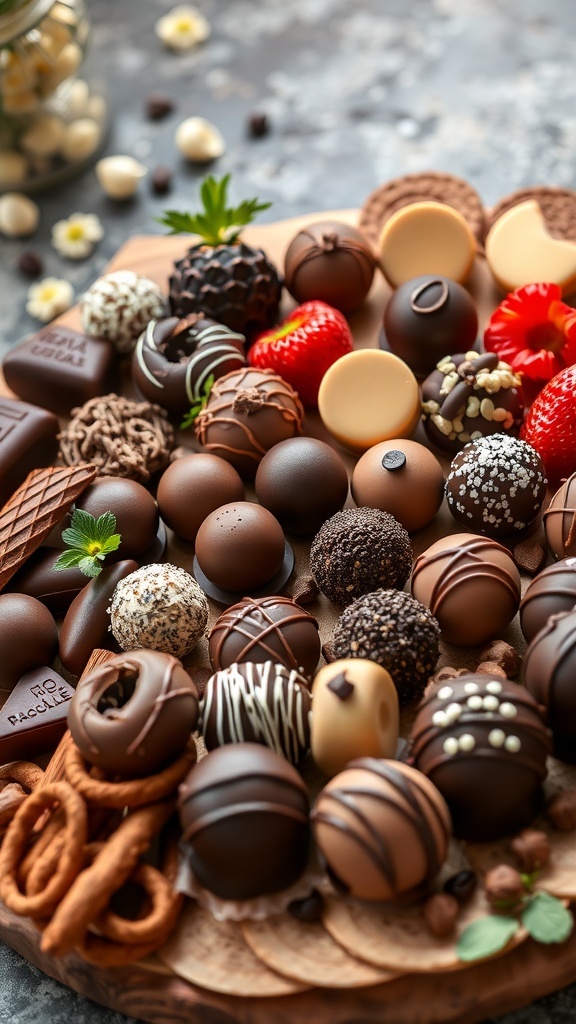
Chocolate lovers, rejoice! This dessert charcuterie board is a delightful feast for the eyes and the taste buds. Imagine a wooden platter overflowing with an array of chocolates, truffles, and sweet treats. Each piece is a little work of art, inviting you to take a bite. From rich dark chocolate truffles to creamy white chocolate bonbons, there’s something for everyone.
Adding fresh strawberries and mint leaves enhances the presentation and adds a pop of color. The mix of textures—from smooth chocolate to crunchy pretzels—makes every bite exciting. You can also throw in some chocolate-covered nuts or cookies for extra variety.
This board is perfect for gatherings, movie nights, or simply treating yourself. It’s easy to assemble and allows for creativity. You can customize it based on your favorite chocolates or seasonal ingredients.
Ingredients
- 1 cup dark chocolate truffles
- 1 cup milk chocolate bonbons
- 1 cup white chocolate treats
- 1 cup fresh strawberries
- 1 cup chocolate-covered pretzels
- 1/2 cup chocolate-covered nuts
- Fresh mint leaves for garnish
Instructions
- Gather all your ingredients and a large wooden board.
- Start by placing the larger items, like chocolate truffles and bonbons, in clusters on the board.
- Fill in gaps with fresh strawberries and pretzels for color and crunch.
- Sprinkle chocolate-covered nuts around the board for added texture.
- Finish with fresh mint leaves for a touch of freshness and garnish.
- Serve immediately and enjoy the sweet indulgence!
Fruit and Yogurt Parfait Cups
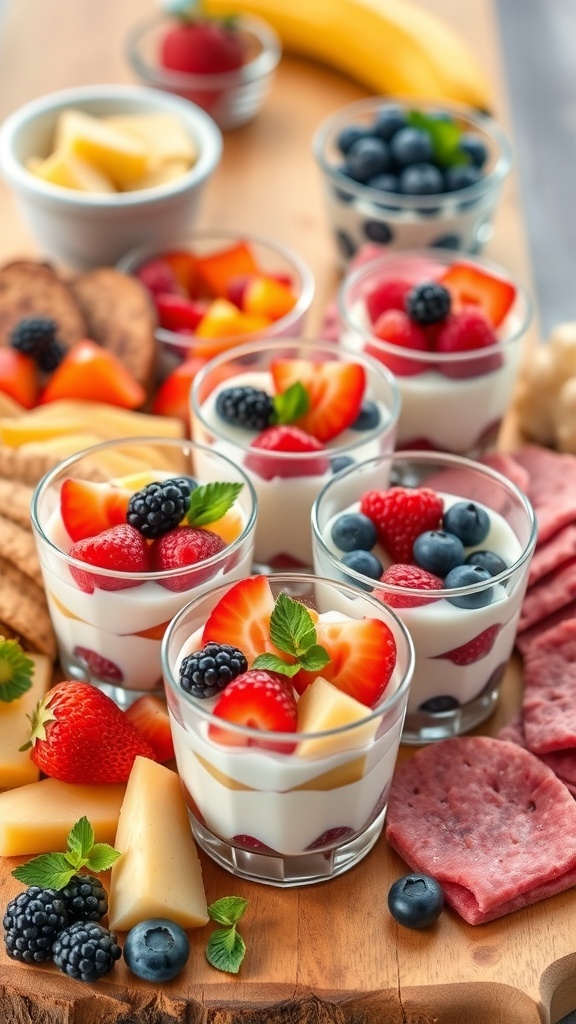
Fruit and yogurt parfait cups are a fun and colorful addition to any dessert charcuterie board. They are not only visually appealing but also packed with flavor and nutrition. Each cup layers creamy yogurt with fresh fruits, creating a delightful treat that everyone will love.
To make these parfaits, you can use a variety of fruits like strawberries, blueberries, raspberries, and bananas. The yogurt can be plain or flavored, depending on your preference. The combination of textures from the crunchy fruits and smooth yogurt makes for a satisfying bite.
These parfait cups are perfect for gatherings, as they are easy to serve and eat. You can even customize them for different tastes by adding granola, nuts, or a drizzle of honey on top. They are a great way to add a healthy option to your dessert spread!
Ingredients
- 2 cups of plain or flavored yogurt
- 1 cup of strawberries, sliced
- 1 cup of blueberries
- 1 cup of raspberries
- 1 banana, sliced
- 1 cup of granola (optional)
- Honey or maple syrup (optional)
- Fresh mint leaves for garnish
Instructions
- Prepare the Ingredients: Wash and slice all the fruits. If using granola, have it ready for layering.
- Layer the Cups: In small cups or glasses, start with a layer of yogurt at the bottom. Add a layer of mixed fruits, followed by another layer of yogurt.
- Add Granola: If using, sprinkle a layer of granola on top of the yogurt.
- Repeat Layers: Continue layering yogurt and fruits until the cups are filled, finishing with a layer of fruits on top.
- Garnish: Drizzle with honey or maple syrup if desired, and add a mint leaf for a fresh touch.
- Serve: Chill in the refrigerator until ready to serve, and enjoy your delicious fruit and yogurt parfait cups!
Gourmet Cookie Selection

When it comes to dessert charcuterie boards, a gourmet cookie selection can really steal the show. Imagine a beautiful wooden platter filled with an array of cookies, each one more tempting than the last. From classic chocolate chip to colorful iced cookies, there’s something for everyone. The visual appeal of these treats adds to the excitement of any gathering.
Consider including a mix of textures and flavors. Soft, chewy cookies pair well with crisp, crunchy ones. You might add some decorated sugar cookies shaped like hearts or stars for a festive touch. Don’t forget about the chocolate-dipped varieties! They bring a rich flavor that complements the sweetness of the other cookies.
For a fun twist, think about including some unique flavors. Lavender-infused cookies or matcha green tea cookies can surprise your guests and spark conversation. You can also offer cookies with different toppings—sprinkles, nuts, or drizzles of chocolate—to create a colorful display.
Now, let’s get into a delightful cookie recipe that will be a hit on your dessert board!
Ingredients
- 2 1/4 cups all-purpose flour
- 1/2 teaspoon baking soda
- 1/2 teaspoon salt
- 3/4 cup unsalted butter, softened
- 1 cup granulated sugar
- 1/2 cup brown sugar, packed
- 1 teaspoon vanilla extract
- 2 large eggs
- 2 cups chocolate chips
- 1/2 cup chopped nuts (optional)
Instructions
- Preheat your oven to 350°F (175°C).
- In a bowl, whisk together the flour, baking soda, and salt. Set aside.
- In a large mixing bowl, cream together the softened butter, granulated sugar, and brown sugar until smooth.
- Add in the vanilla extract and eggs, mixing until well combined.
- Gradually add the dry ingredients to the wet mixture, stirring until just combined.
- Fold in the chocolate chips and nuts if using.
- Drop spoonfuls of dough onto a baking sheet lined with parchment paper.
- Bake for 10-12 minutes or until the edges are golden brown.
- Let cool on the baking sheet for a few minutes before transferring to a wire rack to cool completely.
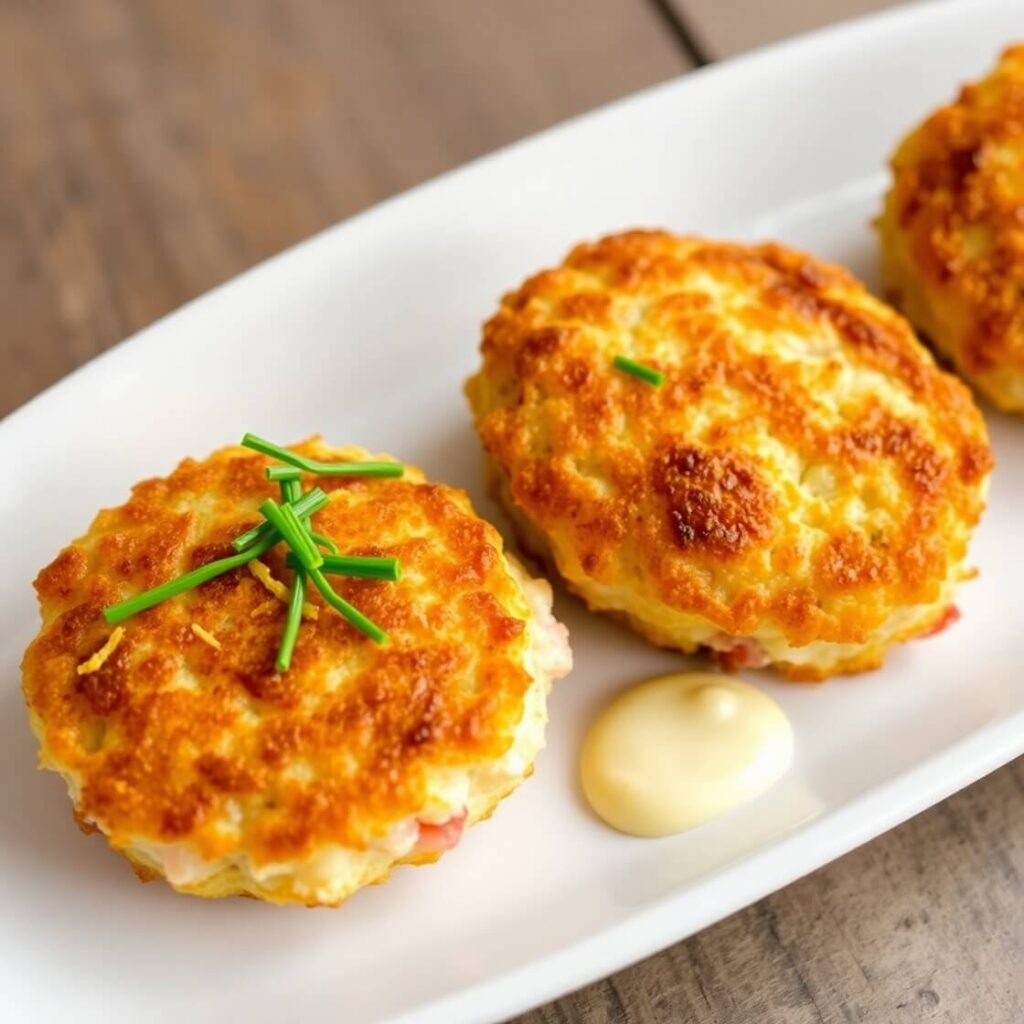
Decadent Cheesecake Bites
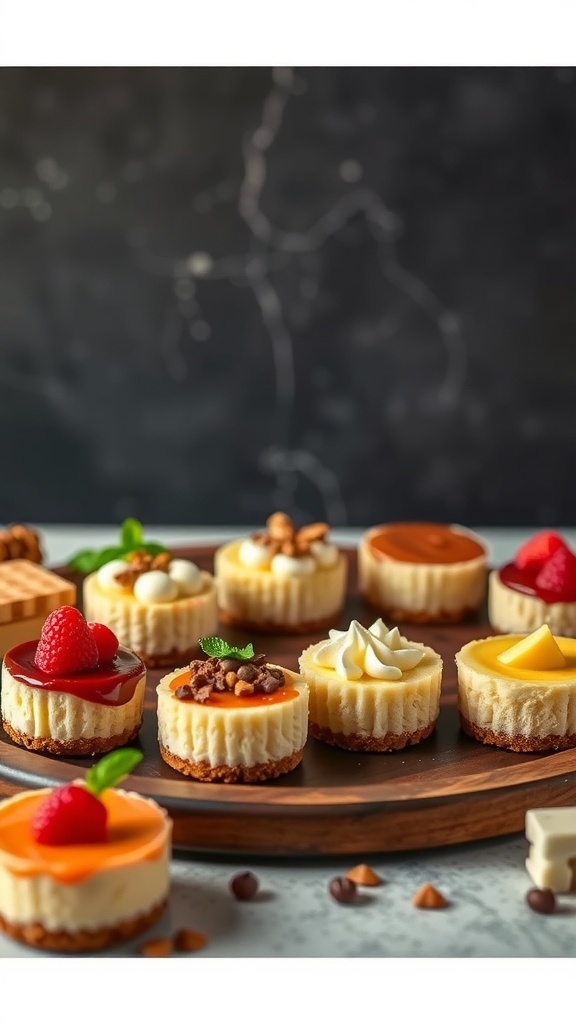
Cheesecake bites are a fun and delightful addition to any dessert charcuterie board. These mini treats pack all the creamy goodness of traditional cheesecake into bite-sized portions. They come in various flavors and toppings, making them visually appealing and perfect for sharing.
Imagine a platter filled with these little gems, each one topped with fresh fruits, chocolate drizzles, or nuts. The variety allows everyone to pick their favorite without feeling overwhelmed. Plus, they’re easy to make and can be prepared ahead of time, making them a stress-free option for gatherings.
Here’s a simple recipe to create your own cheesecake bites:
Ingredients
- 1 cup graham cracker crumbs
- 1/4 cup granulated sugar
- 1/2 cup unsalted butter, melted
- 16 oz cream cheese, softened
- 1 cup powdered sugar
- 1 teaspoon vanilla extract
- 2 large eggs
- Your choice of toppings (fruit, chocolate, nuts, etc.)
Instructions
- Preheat your oven to 325°F (160°C). Line a mini muffin tin with paper liners.
- In a bowl, mix graham cracker crumbs, sugar, and melted butter until combined. Press this mixture into the bottom of each muffin cup.
- In another bowl, beat the cream cheese until smooth. Gradually add powdered sugar and vanilla, mixing well.
- Add eggs one at a time, mixing until just combined. Be careful not to overmix.
- Pour the cream cheese mixture over the crusts in the muffin tin, filling each cup about 3/4 full.
- Bake for 15-20 minutes, or until the centers are set. Let them cool completely before removing from the tin.
- Top each cheesecake bite with your favorite toppings and enjoy!
Fruity Delight with Cheese Pairing
Creating a fruity delight with cheese is a fun way to impress your guests. This dessert charcuterie board showcases a vibrant mix of fresh fruits and creamy cheeses. Think strawberries, blueberries, and grapes, all beautifully arranged alongside slices of cheese. The colors pop, making it visually appealing and inviting.
Pairing cheese with fruit is a classic combination. The sweetness of the fruits balances the richness of the cheese. For example, creamy brie goes well with strawberries, while sharp cheddar complements the sweetness of grapes. Don’t forget to add some crunchy crackers to the mix for texture!
To make your own fruity cheese board, gather a variety of fruits and cheeses. Arrange them on a large platter, mixing colors and textures. Add some mint leaves for a fresh touch. This board is perfect for gatherings, picnics, or just a cozy night in.
Ingredients
- 1 cup strawberries, hulled and halved
- 1 cup blueberries
- 1 cup grapes, halved
- 1 cup blackberries
- 8 ounces brie cheese, sliced
- 8 ounces cheddar cheese, sliced
- 1 cup cream cheese
- 1 package of assorted crackers
- Fresh mint leaves for garnish
Instructions
- Prepare the Fruits: Wash and cut the strawberries, grapes, and any other fruits you want to include.
- Arrange the Cheese: Slice the brie and cheddar cheese into bite-sized pieces.
- Build the Board: Start by placing the cheeses on a large platter. Then, fill in the spaces with the fruits and crackers.
- Add Garnish: Top with fresh mint leaves for a pop of color and freshness.
- Serve: Enjoy your fruity cheese board with friends and family!
Mini Pastry Assortment

Mini pastries are a delightful addition to any dessert charcuterie board. They bring a variety of flavors and textures that can please any sweet tooth. Imagine a spread filled with tiny tarts, cream-filled éclairs, and colorful cupcakes. Each bite-sized treat offers a unique taste experience, making it fun for guests to sample different options.
Consider including items like fruit tarts topped with fresh berries, chocolate éclairs drizzled with rich ganache, and mini cheesecakes adorned with whipped cream. Don’t forget about classic favorites like petit fours and macarons, which add a touch of elegance to your board.
To make your mini pastry assortment even more appealing, arrange them in a visually pleasing way. Use different heights and colors to create an eye-catching display. You can also add fresh fruits, like strawberries and blueberries, to enhance the look and taste.
Ingredients
- 1 package of puff pastry sheets
- 1 cup pastry cream
- 1 cup whipped cream
- 1 cup fresh berries (strawberries, blueberries, raspberries)
- 1 cup chocolate ganache
- 1 cup mini cupcake batter (vanilla or chocolate)
- 1/2 cup fondant (for decorations)
- 1/4 cup powdered sugar (for dusting)
Instructions
- Preheat the oven to 400°F (200°C). Roll out the puff pastry and cut into small squares. Bake until golden brown, about 15 minutes.
- Once cooled, fill half of the pastries with pastry cream and top with fresh berries.
- For the éclairs, pipe the pastry cream into the baked shells and drizzle with chocolate ganache.
- Prepare mini cupcakes using your favorite batter and frost with whipped cream.
- Use fondant to create decorative shapes for the pastries, if desired.
- Arrange all the pastries on a serving board, dust with powdered sugar, and add extra berries for garnish.
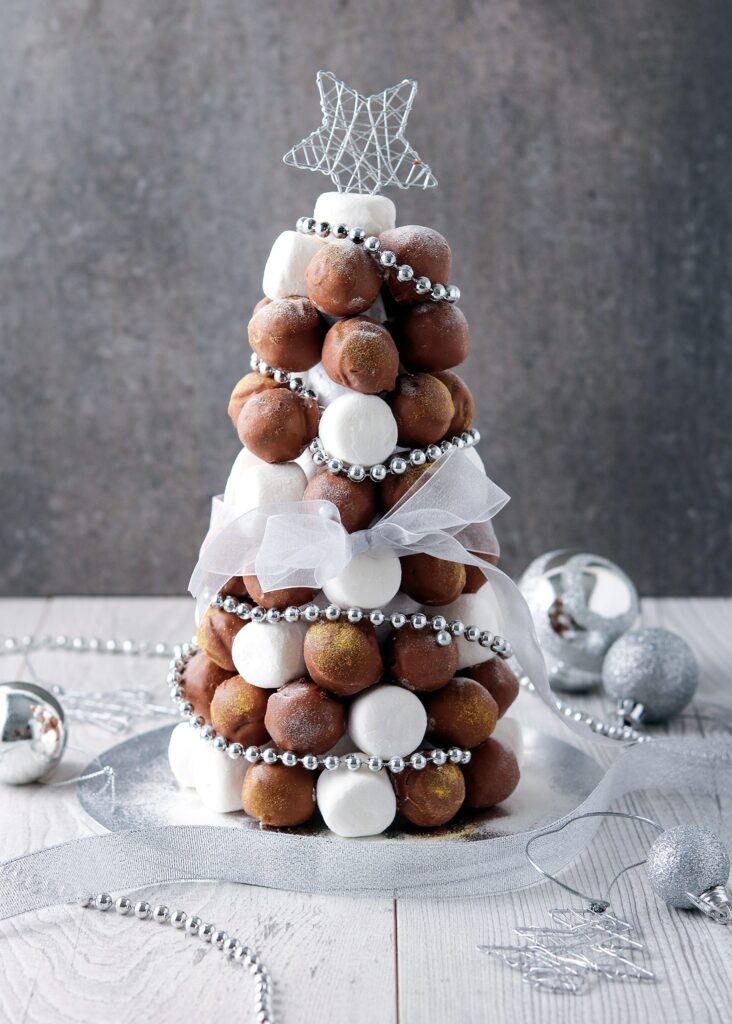
Homemade Marshmallow and S’mores Station
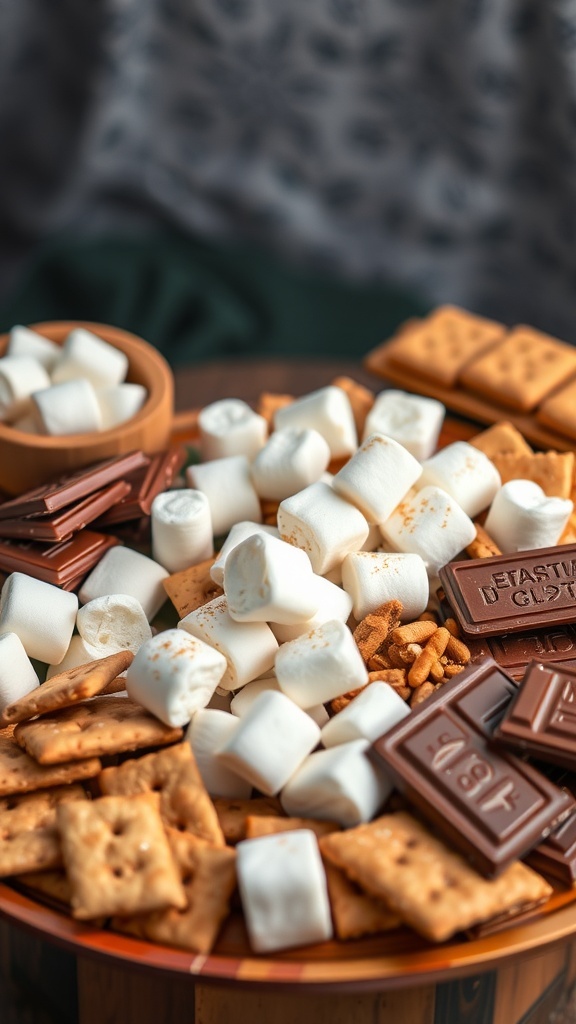
Setting up a homemade marshmallow and s’mores station is a fun way to enjoy a classic treat. Imagine a beautiful spread of fluffy marshmallows, crunchy graham crackers, and rich chocolate bars. This setup invites everyone to create their own s’mores, making it a perfect addition to any dessert charcuterie board.
Start with a variety of marshmallows. You can have classic white ones, flavored options like strawberry or chocolate, and even mini marshmallows for a fun twist. Next, include different types of chocolate. Milk chocolate is a favorite, but dark chocolate or even peanut butter cups can add a unique flavor.
Don’t forget the graham crackers! You can stick with the traditional ones or try chocolate-covered graham crackers for an extra treat. To make it even more exciting, consider adding toppings like crushed nuts, sprinkles, or even a drizzle of caramel sauce.
Setting up a small fire pit or using a kitchen torch can make toasting marshmallows easy and fun. Guests can roast their marshmallows to their liking, whether they prefer them lightly toasted or perfectly charred. This interactive element makes the experience memorable.
With this s’mores station, everyone can customize their treats just the way they like. It’s a delightful way to bring people together, enjoy sweet flavors, and create lasting memories.
Ingredients
- 1 bag of large marshmallows
- 1 box of graham crackers
- 2-3 types of chocolate bars (milk, dark, or flavored)
- Optional toppings: crushed nuts, sprinkles, caramel sauce
Instructions
- Set up a table with all the ingredients laid out for easy access.
- Arrange marshmallows, graham crackers, and chocolate bars in separate bowls or platters.
- If using a fire pit or torch, ensure it’s safe and ready for toasting marshmallows.
- Encourage guests to create their s’mores by toasting marshmallows and layering them between graham crackers and chocolate.
- Enjoy the delicious creations together!
Savory and Sweet Nut Medley
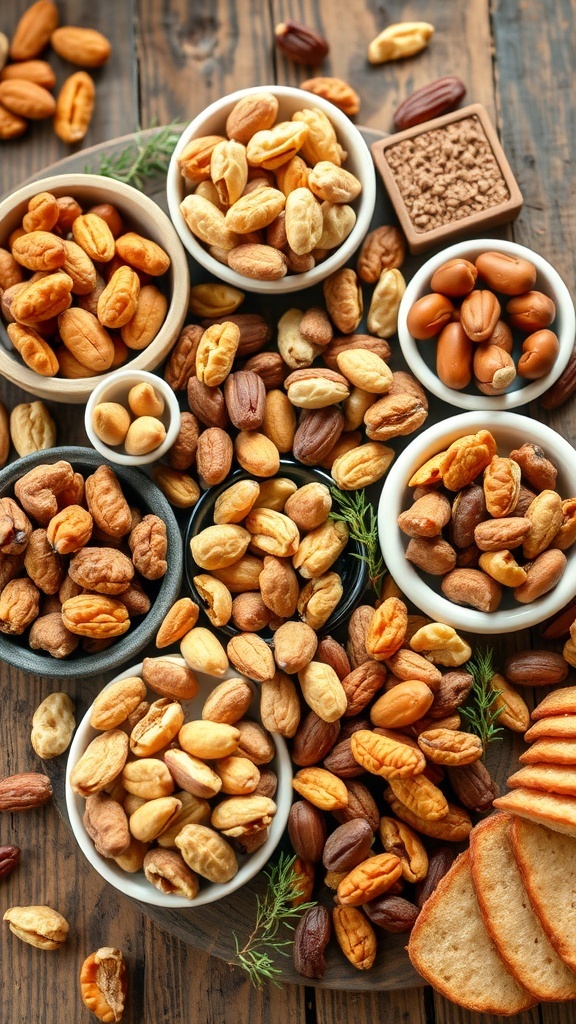
A dessert charcuterie board can be a delightful mix of flavors and textures. One great idea is to create a savory and sweet nut medley. Picture a beautiful arrangement of various nuts, each offering a unique taste. You can use roasted almonds, honey-glazed pecans, and spicy cashews. Mixing sweet and savory nuts adds depth to your board.
Don’t forget to include some dried fruits like cranberries or apricots for a pop of color and sweetness. You can also add a few slices of cheese or crackers to complement the nuts. This combination makes for a perfect snack that guests will love.
For a fun twist, consider adding some chocolate-covered nuts or a sprinkle of sea salt to enhance the flavors. The contrast between the sweet and salty will keep everyone coming back for more!
Ingredients
- 1 cup roasted almonds
- 1 cup honey-glazed pecans
- 1 cup spicy cashews
- 1 cup dried cranberries
- 1 cup dried apricots
- 1 cup chocolate-covered nuts
- 1 cup assorted crackers
- 1 cup cheese slices
Instructions
- Gather all your ingredients and choose a large platter or board.
- Start by placing the nuts in small bowls or directly on the board, arranging them in clusters.
- Add the dried fruits in between the nuts for color and sweetness.
- Include cheese slices and crackers around the nuts and fruits.
- For a finishing touch, sprinkle some sea salt over the nuts or add a small bowl of honey for drizzling.
- Serve immediately and enjoy the delightful mix of flavors!
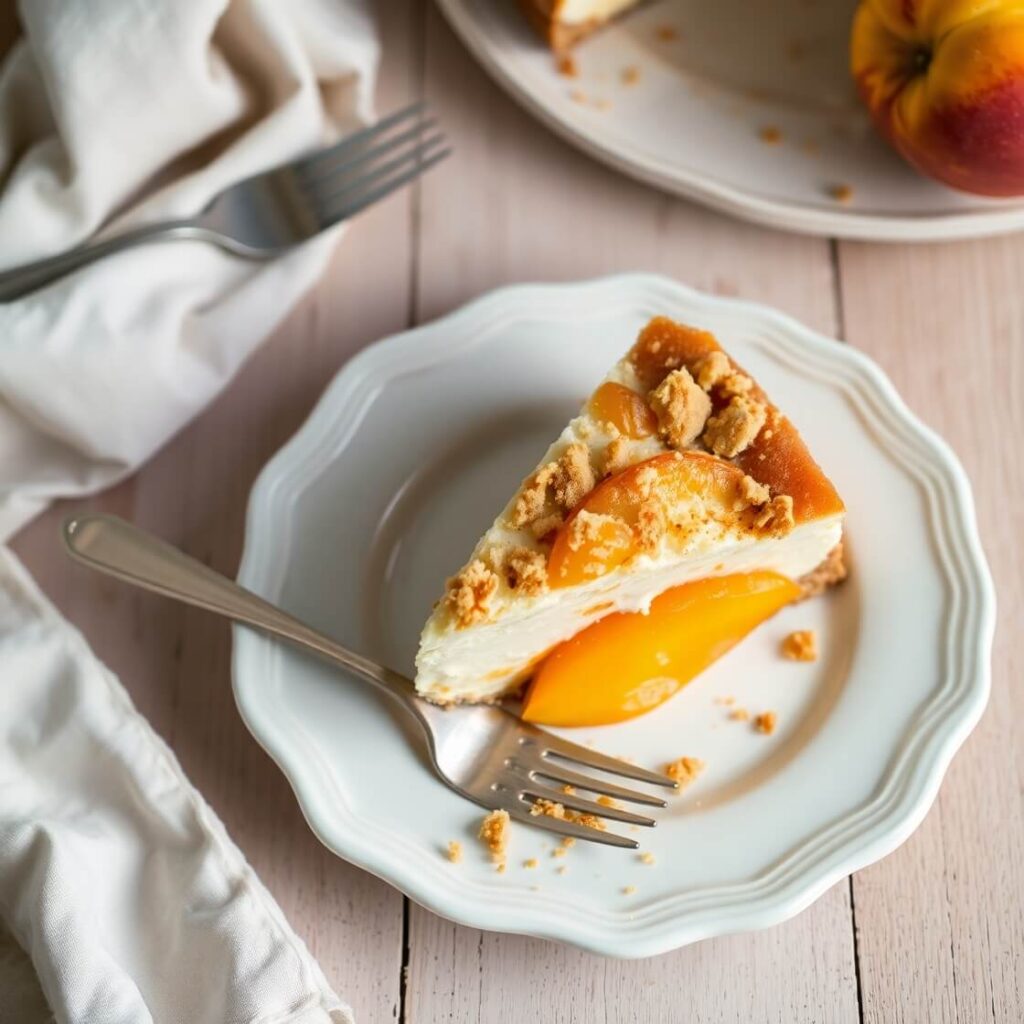
Seasonal Fruit Tartlets
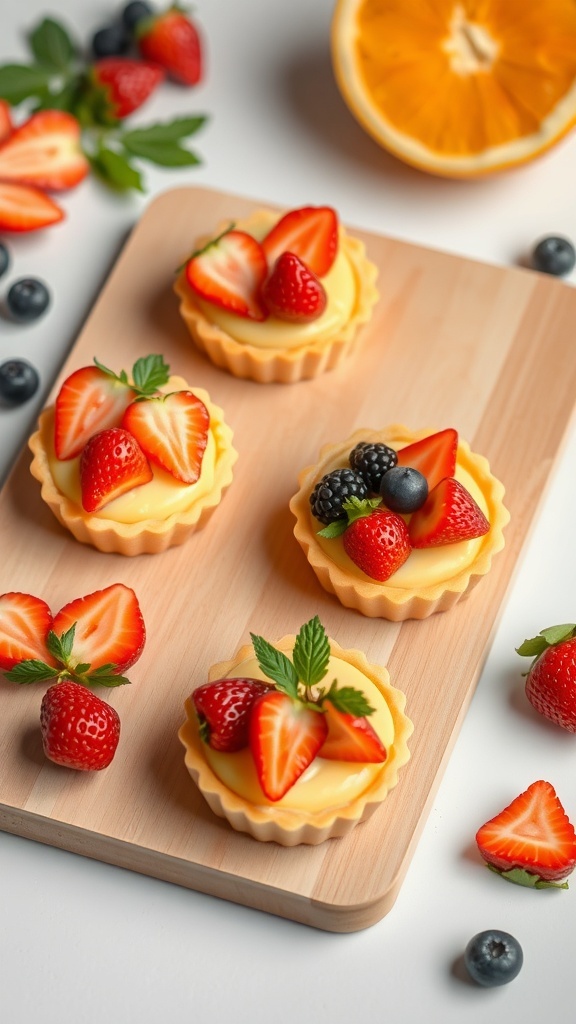
Seasonal fruit tartlets are a delightful addition to any dessert charcuterie board. These little treats are not only visually appealing but also bursting with fresh flavors. Each tartlet features a crisp crust filled with creamy custard and topped with vibrant fruits like strawberries, blueberries, and blackberries. The combination of textures and tastes makes them a crowd-pleaser.
Making these tartlets is simple and fun. You can use store-bought pastry shells or make your own. The key is to fill them with a smooth custard or pastry cream and then let your creativity shine with the fruit toppings. Arrange them on a wooden board, and watch as they become the star of your dessert spread!
Ingredients
- 1 package of pre-made tartlet shells
- 1 cup pastry cream or vanilla pudding
- 1 cup strawberries, sliced
- 1 cup blueberries
- 1 cup blackberries
- Fresh mint leaves for garnish
Instructions
- Prepare the Tartlets: If using pre-made shells, arrange them on a serving platter.
- Fill with Cream: Spoon pastry cream or pudding into each tartlet shell until full.
- Add Fruits: Top each tartlet with a mix of sliced strawberries, blueberries, and blackberries.
- Garnish: Add a mint leaf on top for a fresh touch.
- Serve: Enjoy these tartlets chilled or at room temperature!
Chocolate Dipped Treats
Chocolate dipped treats are a fun and tasty addition to any dessert charcuterie board. They bring a delightful mix of flavors and textures that everyone loves. Imagine a spread featuring pretzels, marshmallows, and strawberries all coated in rich chocolate. The contrast between the sweet chocolate and the salty pretzels is simply irresistible.
To create your own chocolate dipped treats, gather a variety of items. You can use pretzels, fruits like strawberries and bananas, or even marshmallows. Melt some chocolate in a microwave or double boiler, then dip your chosen treats into the chocolate. Let them cool on parchment paper until the chocolate hardens.
For an extra touch, drizzle some white chocolate over the dipped items or sprinkle them with colorful sprinkles. This not only enhances the flavor but also adds visual appeal to your board.
Ingredients
- 1 cup pretzels
- 1 cup strawberries
- 1 cup marshmallows
- 1 cup chocolate chips (dark or milk)
- 1/2 cup white chocolate chips (optional for drizzling)
- Sprinkles (optional)
Instructions
- Melt the chocolate chips in a microwave-safe bowl in 30-second intervals, stirring in between until smooth.
- Dip each pretzel, strawberry, or marshmallow into the melted chocolate, allowing excess to drip off.
- Place the dipped treats on parchment paper to cool.
- If using, melt the white chocolate and drizzle it over the cooled treats.
- Sprinkle with colorful sprinkles if desired and let everything set completely before serving.
Elegant Macaron Display
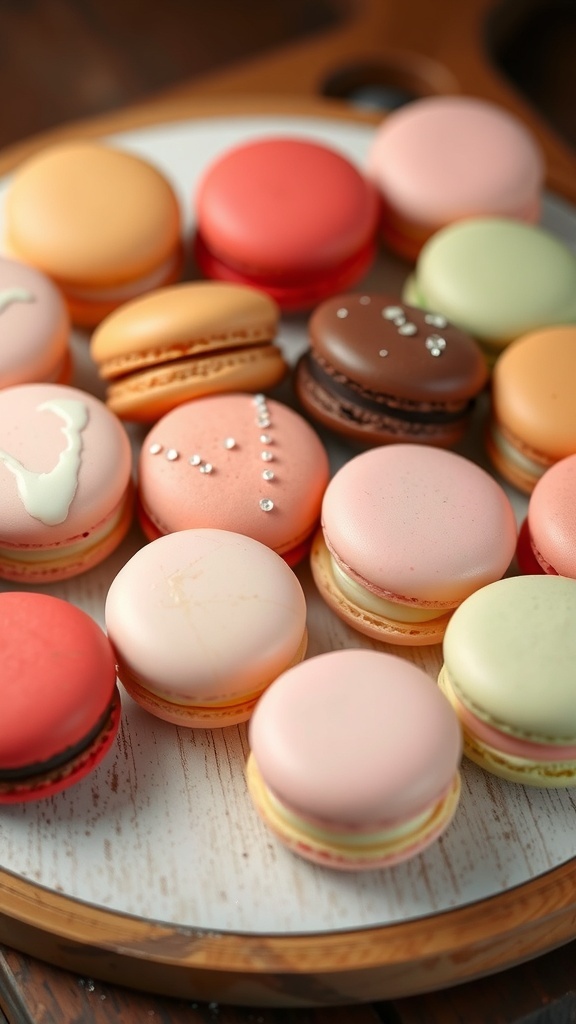
Macarons are a delightful addition to any dessert charcuterie board. Their vibrant colors and delicate textures make them visually appealing and a treat for the taste buds. These little treats come in various flavors, from classic vanilla and chocolate to fruity options like raspberry and lemon. Arranging them on a beautiful platter can create an eye-catching centerpiece for your dessert table.
To enhance the display, consider using decorative elements like edible flowers or fresh fruits around the macarons. This not only adds color but also provides a contrast that highlights the macarons’ beauty. You can mix and match flavors and colors to create a stunning visual effect that will impress your guests.
For a fun twist, try incorporating themed macarons for special occasions. For example, pastel colors for spring celebrations or rich, dark hues for fall gatherings. The possibilities are endless!
Ingredients
- 1 cup almond flour
- 1 3/4 cups powdered sugar
- 3 large egg whites
- 1/4 cup granulated sugar
- 1 teaspoon vanilla extract
- Food coloring (optional)
- Buttercream or ganache for filling
Instructions
- Prepare the Batter: In a bowl, sift together almond flour and powdered sugar. In a separate bowl, beat egg whites until foamy. Gradually add granulated sugar and continue beating until stiff peaks form. Gently fold in the almond flour mixture and vanilla extract. If desired, add food coloring to achieve your preferred hue.
- Pipe the Macarons: Transfer the batter to a piping bag and pipe small circles onto a baking sheet lined with parchment paper. Let them sit for about 30 minutes to form a skin.
- Bake: Preheat the oven to 300°F (150°C). Bake the macarons for 15-20 minutes, until they have risen and formed a shell. Allow them to cool completely.
- Fill: Once cooled, pair the macarons and fill them with your choice of buttercream or ganache. Sandwich them together and let them rest for a few hours before serving.
Savory and Sweet Biscotti Pairing

Biscotti are a delightful addition to any dessert charcuterie board. These crunchy treats come in various flavors, making them perfect for pairing with sweet dips and fresh fruits. In the image, you can see a beautiful arrangement of biscotti alongside chocolate sauce, whipped cream, and fruit preserves. The contrast of textures and flavors makes this setup inviting and fun.
For a savory twist, consider adding cheese or nuts to your biscotti selection. A hint of rosemary or thyme can elevate the flavor profile, making them a great match for creamy dips. The combination of sweet and savory is a crowd-pleaser, perfect for gatherings or cozy nights in.
To create your own biscotti pairing, think about the flavors you enjoy. Chocolate chip biscotti pairs wonderfully with a rich chocolate dip, while almond biscotti can be complemented by a fruity preserve. Fresh berries and mint add a refreshing touch, making the board visually appealing and delicious.
Ingredients
- 2 cups all-purpose flour
- 1 cup granulated sugar
- 1/2 cup unsalted butter, softened
- 3 large eggs
- 1 teaspoon vanilla extract
- 1 teaspoon baking powder
- 1/2 teaspoon salt
- 1 cup chocolate chips
- 1/2 cup chopped nuts (optional)
Instructions
- Preheat your oven to 350°F (175°C). Line a baking sheet with parchment paper.
- In a large bowl, cream together the butter and sugar until light and fluffy. Add the eggs one at a time, mixing well after each addition. Stir in the vanilla.
- In another bowl, whisk together the flour, baking powder, and salt. Gradually add the dry ingredients to the wet mixture, mixing until just combined. Fold in the chocolate chips and nuts if using.
- Divide the dough in half and shape each half into a log about 12 inches long on the prepared baking sheet. Flatten each log slightly.
- Bake for 25-30 minutes until golden. Remove from the oven and let cool for about 10 minutes.
- Slice the logs diagonally into 1-inch thick pieces. Arrange the slices cut side down on the baking sheet and bake for an additional 15-20 minutes until crisp.
- Allow to cool completely before serving. Enjoy with your favorite dips and fruits!
Decadent Brownie and Blondie Squares
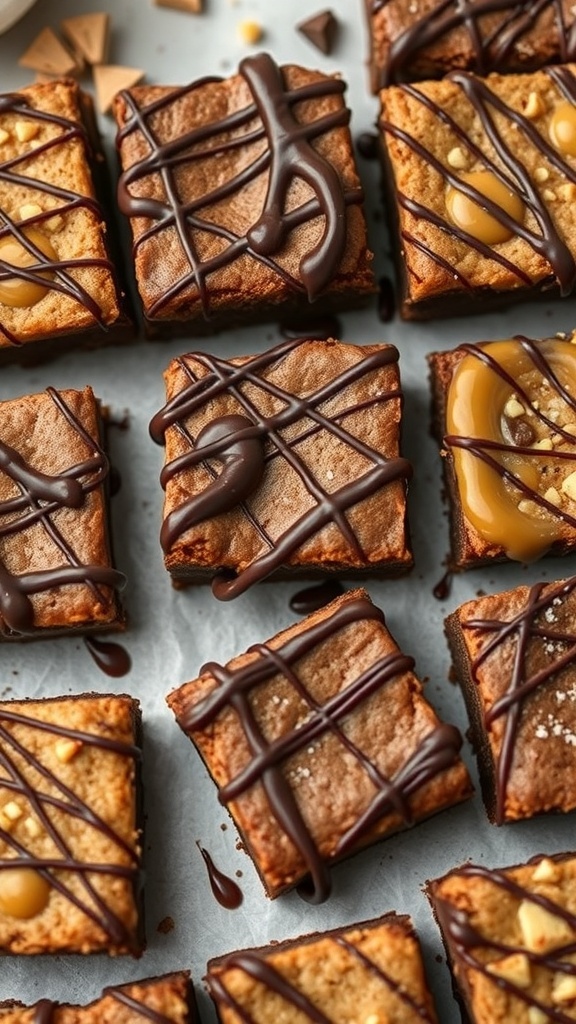
Brownie and blondie squares are a delightful addition to any dessert charcuterie board. These treats are rich and satisfying, offering a perfect balance of chocolatey goodness and buttery sweetness. The image showcases beautifully cut squares, drizzled with chocolate and topped with caramel and nuts, making them visually appealing and irresistible.
These squares can be served alongside fresh fruits, whipped cream, or even ice cream for a fun twist. They are easy to slice and serve, making them a crowd-pleaser at gatherings. The combination of textures and flavors will surely impress your guests.
Ingredients
- 1 cup unsalted butter
- 2 cups granulated sugar
- 4 large eggs
- 1 teaspoon vanilla extract
- 1 cup all-purpose flour
- 1/2 cup cocoa powder (for brownies)
- 1/2 teaspoon salt
- 1 cup brown sugar (for blondies)
- 1 cup white chocolate chips (for blondies)
- 1/2 cup chocolate chips (for brownies)
- Caramel sauce for drizzling
- Chopped nuts for topping
Instructions
- Preheat your oven to 350°F (175°C) and grease a baking pan.
- For the brownies, melt the butter in a saucepan. Stir in granulated sugar, eggs, and vanilla until well combined. Add flour, cocoa powder, and salt. Mix until smooth. Pour into the prepared pan.
- For the blondies, in a separate bowl, mix melted butter with brown sugar. Add eggs and vanilla, then stir in flour and white chocolate chips. Pour over the brownie layer.
- Bake both layers together for about 25-30 minutes or until a toothpick comes out clean. Let cool completely before cutting into squares.
- Drizzle with caramel sauce and sprinkle with chopped nuts before serving.
Gourmet Ice Cream Sandwiches
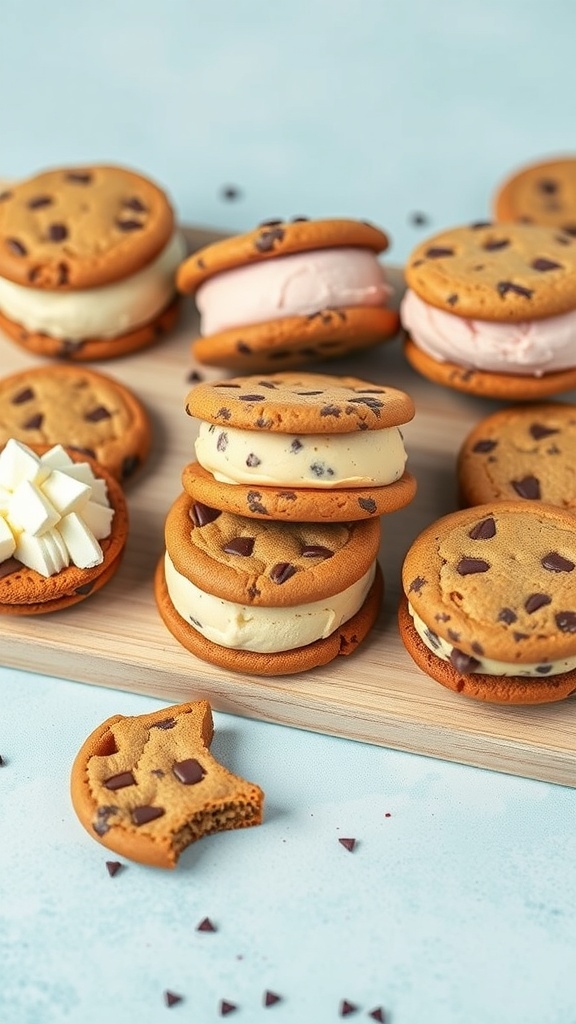
Gourmet ice cream sandwiches are a fun and delicious way to elevate your dessert charcuterie board. Imagine soft, chewy cookies hugging creamy ice cream, creating a delightful treat that everyone will love. You can mix and match flavors and textures to create a unique experience.
Start with classic chocolate chip cookies or try something different like snickerdoodle or oatmeal raisin. For the ice cream, consider flavors like vanilla bean, mint chocolate chip, or even fruity options like strawberry. The combinations are endless!
To make them even more special, roll the edges in sprinkles, mini chocolate chips, or crushed nuts. This adds a fun crunch and a pop of color. These sandwiches are not just tasty; they also look great on your board, making them an eye-catching centerpiece.
Ingredients
- 1 cup unsalted butter, softened
- 1 cup brown sugar
- 1/2 cup granulated sugar
- 2 large eggs
- 2 teaspoons vanilla extract
- 2 1/2 cups all-purpose flour
- 1 teaspoon baking soda
- 1/2 teaspoon salt
- 1 cup chocolate chips
- 1 pint of your favorite ice cream
Instructions
- Preheat your oven to 350°F (175°C). Line baking sheets with parchment paper.
- In a large bowl, cream together the softened butter, brown sugar, and granulated sugar until smooth. Add the eggs and vanilla, mixing well.
- In another bowl, whisk together the flour, baking soda, and salt. Gradually add this to the butter mixture, stirring until combined. Fold in the chocolate chips.
- Drop tablespoon-sized balls of dough onto the prepared baking sheets, spacing them about 2 inches apart. Bake for 10-12 minutes, or until golden brown. Let them cool completely.
- Once the cookies are cool, scoop a generous amount of ice cream onto the flat side of one cookie. Top with another cookie, pressing gently to create a sandwich. Roll the edges in sprinkles or chocolate chips if desired.
- Freeze the sandwiches for about 30 minutes before serving to firm them up. Enjoy your gourmet ice cream sandwiches!
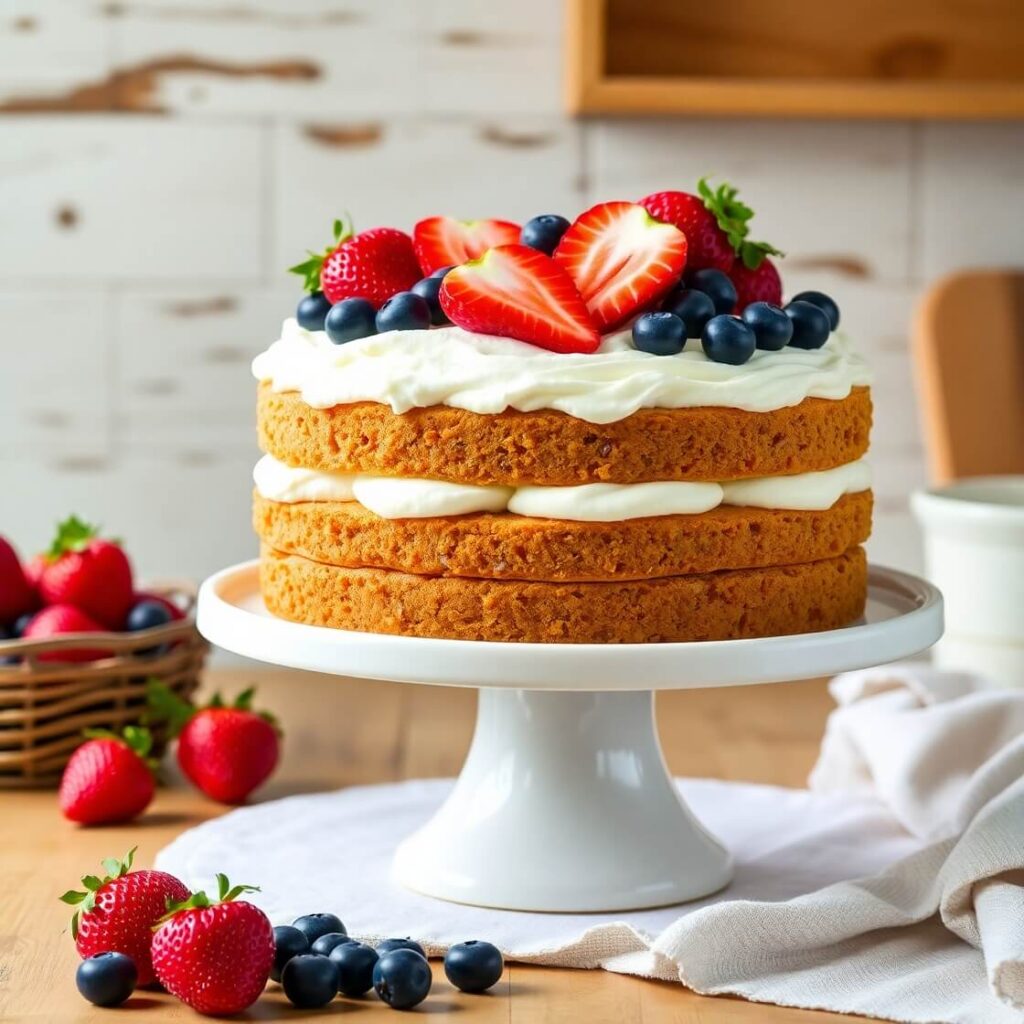
Layered Cake Slices
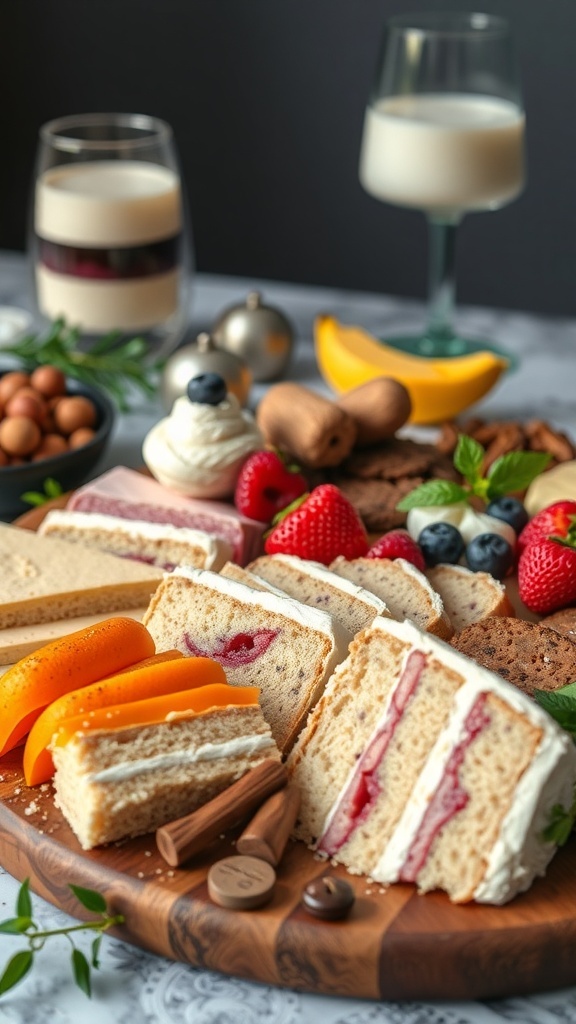
Layered cake slices are a delightful addition to any dessert charcuterie board. They bring color, texture, and a variety of flavors that can please any sweet tooth. Imagine a platter filled with beautiful slices of cake, each one showcasing different layers and fillings. You can mix and match flavors like vanilla, chocolate, and fruit to create a stunning visual feast.
Consider using cakes with different textures, such as a light sponge cake paired with a rich buttercream or a fruity filling. You can even add some fun elements like sprinkles or edible flowers on top for that extra charm. These cake slices not only taste amazing but also look fantastic on your board, making them a crowd-pleaser.
To make your dessert charcuterie board even more appealing, pair the cake slices with fresh fruits like strawberries, blueberries, or citrus slices. This adds a refreshing contrast to the sweetness of the cake. You can also include some chocolate or cookie bites for variety, creating a balanced selection that everyone will enjoy.
Ingredients
- 1 box of vanilla cake mix
- 3 large eggs
- 1 cup water
- 1/2 cup vegetable oil
- 1 cup butter, softened
- 4 cups powdered sugar
- 2 tablespoons milk
- 1 teaspoon vanilla extract
- Fruit preserves (like raspberry or strawberry)
- Fresh fruits for garnish (strawberries, blueberries, etc.)
Instructions
- Preheat your oven to 350°F (175°C). Grease and flour two 9-inch round cake pans.
- In a large bowl, mix the cake mix, eggs, water, and oil until well combined. Pour the batter evenly into the prepared pans.
- Bake for 25-30 minutes or until a toothpick inserted in the center comes out clean. Let the cakes cool completely.
- Once cooled, slice each cake in half horizontally to create four layers.
- In a bowl, beat the softened butter until creamy. Gradually add powdered sugar, milk, and vanilla extract. Mix until smooth to create the frosting.
- On a serving platter, place one layer of cake and spread a layer of fruit preserves on top. Add a layer of frosting, then repeat with the other layers.
- Finish with a layer of frosting on top and decorate with fresh fruits and sprinkles.
- Slice into pieces and arrange on your dessert charcuterie board. Enjoy!