Cream Puff Cake Recipe
The first time I made cream puff cake, it wasn’t planned. It was one of those afternoons when I wanted something comforting but not fussy, impressive but still familiar. I remembered a dessert my aunt used to bring to family gatherings—soft, airy layers with a creamy center that always disappeared before dinner was even finished. No one ever called it fancy, but everyone asked for seconds.
That’s the feeling I chase every time I make this cake now. Cream puff cake sits somewhere between a classic choux pastry and an easy, crowd-pleasing sheet cake. It looks like you spent hours on it, but it’s surprisingly forgiving. I’ve made it for birthdays, casual get-togethers, and even quiet weekends when I just wanted something sweet in the fridge to sneak a slice of later.
What I love most is how this dessert feels nostalgic without being old-fashioned. The base puffs up dramatically in the oven, then settles into the perfect foundation for a rich, creamy topping. Every bite is soft, light, and just sweet enough. It’s the kind of dessert that makes people pause mid-bite and say, “Okay, this is really good,” and that’s always my favorite reaction.
Why I Love This Recipe
I love this cream puff cake recipe because it gives you that bakery-style wow factor without demanding bakery-level skills. You don’t need to pipe individual cream puffs or stress about perfection. The oven does most of the work, and the rest comes together calmly, almost gently.
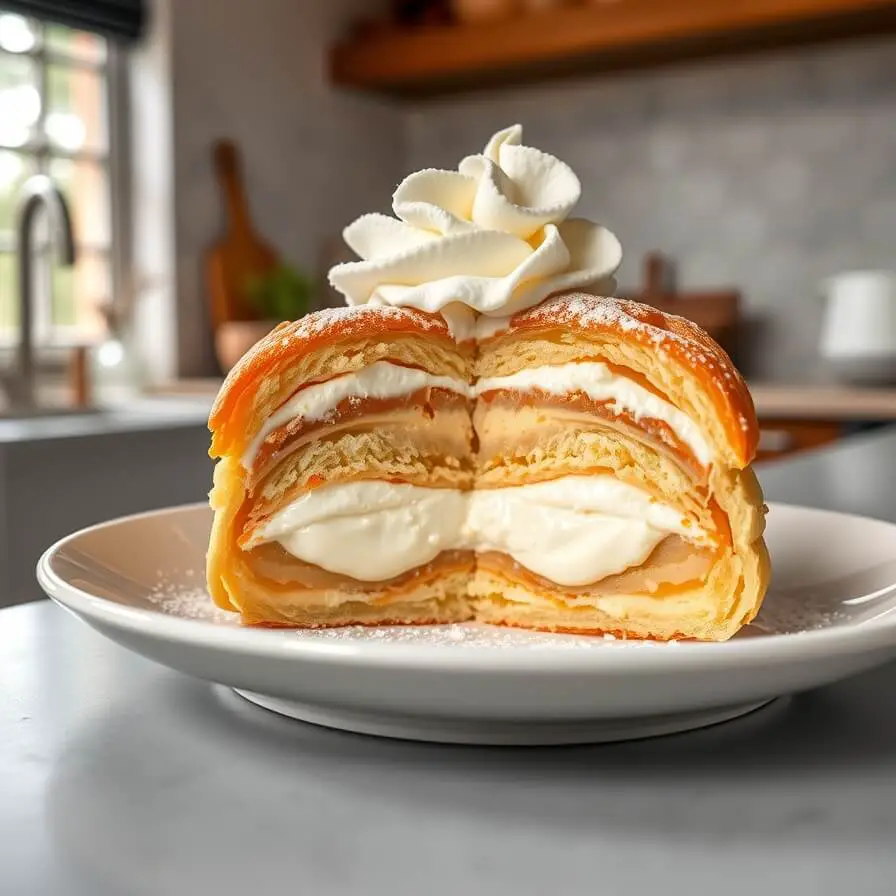
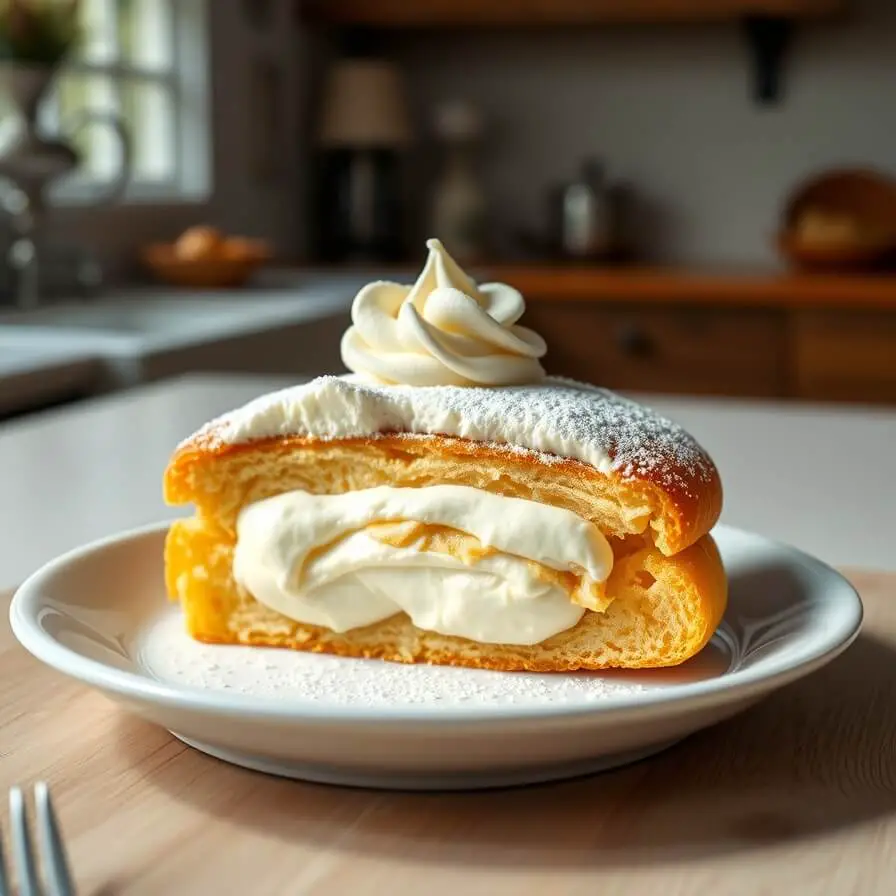
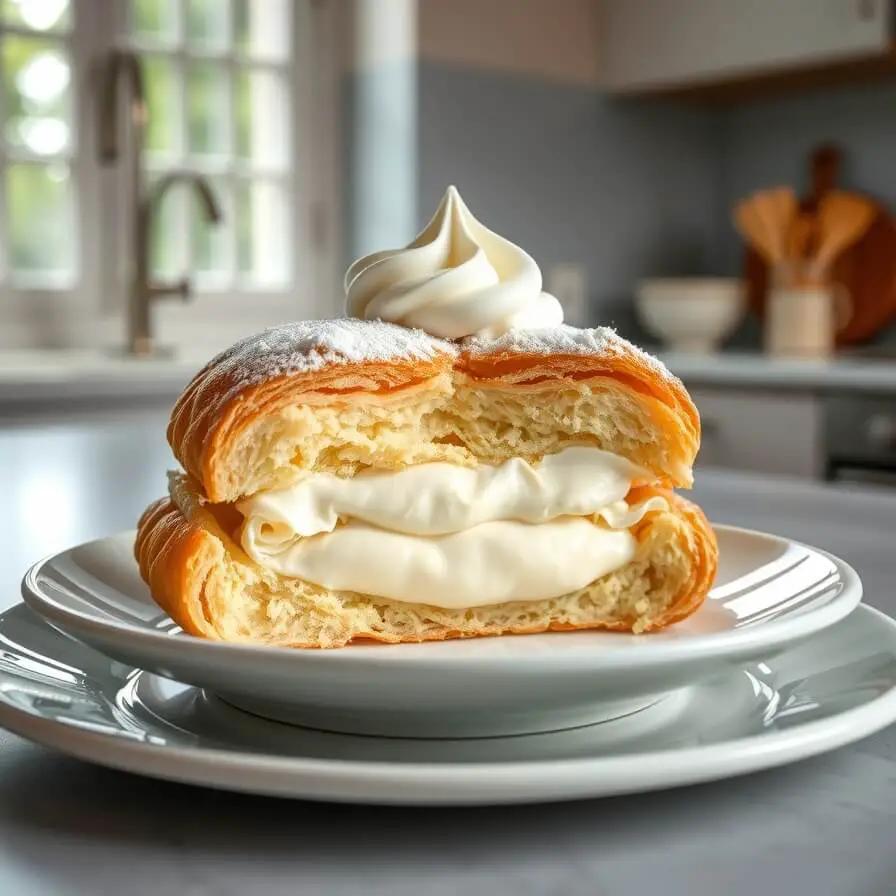
What makes this recipe special is the contrast in textures. The bottom layer is made from choux-style dough, which bakes up light, airy, and slightly crisp at the edges. Once it cools, it softens just enough to hold the creamy filling without becoming soggy. On top of that goes a smooth, cloud-like cream layer that tastes rich but not heavy. When chilled, the whole cake settles into something that slices beautifully yet melts in your mouth.
This is also a recipe I recommend when someone says, “I want to make dessert, but I don’t want to mess it up.” It’s flexible. The flavors are familiar. And even if it doesn’t look perfect, it still tastes incredible. I’ve served this to people who claim they don’t like overly sweet desserts, and they always come back for another slice.
Most importantly, this cake feels generous. It’s meant to be shared. It feeds a crowd, travels well, and somehow tastes even better the next day. That’s the kind of recipe I keep close.
Ingredients for Cream Puff Cake
This recipe doesn’t rely on hard-to-find ingredients, which is another reason I keep coming back to it. Everything here works together in a very intentional way, and understanding why each ingredient matters will help you feel confident as you bake.
You’ll start with butter, which forms the base of the choux-style dough. Butter adds richness and flavor, but it also helps create steam in the oven, which is what makes the dough puff up so dramatically. I always use unsalted butter so I can control the seasoning.
Water may seem simple, but it’s essential. When combined with butter and heated, it creates the moisture needed for that signature puffed texture. Flour comes next, and all-purpose flour works perfectly here. It gives the dough enough structure to rise and hold its shape without becoming dense.
Eggs are the heart of this recipe. They provide structure, richness, and that custardy softness we love in cream puff-style desserts. Adding them one at a time makes the dough smooth and glossy, which is exactly what you’re aiming for.
For the creamy topping, you’ll need a combination of cream cheese and a smooth vanilla pudding base. The cream cheese adds body and a subtle tang, balancing the sweetness beautifully. The pudding layer brings that classic cream puff flavor and helps everything set nicely once chilled.
Milk ties the pudding together, and I prefer whole milk for the creamiest result. Finally, a light topping, often whipped cream or a whipped topping, finishes the cake and adds that final soft, airy layer that makes each bite feel complete.
How Much Time Will You Need
This is one of those desserts that feels like it takes longer than it actually does. From start to finish, you’re looking at a manageable process that fits comfortably into an afternoon.
Active prep time is relatively short. Making the dough and mixing the cream layer doesn’t take long at all, especially once you’ve done it once. Baking time is where the magic happens, but that’s mostly hands-off. After baking, the cake does need time to cool and chill, which is important for the final texture.
I usually plan to make this earlier in the day or even the night before. The chilling time allows the layers to settle and the flavors to come together. When it’s time to serve, all the work is already done, which is always a relief.
How to Make This Cream Puff Cake
This is where everything comes together, and I promise it’s easier than it sounds. Take it step by step, and trust the process.

Step – 1: Prepare the dough base
Start by heating butter and water together in a saucepan over medium heat. Once the butter has fully melted and the mixture begins to gently boil, remove it from the heat. Add the flour all at once and stir vigorously. The mixture will come together quickly into a thick dough. This step is important because it cooks the flour slightly and sets the foundation for that puffed texture.
Step – 2: Add the eggs
Let the dough cool for a few minutes so the eggs don’t scramble. Add the eggs one at a time, mixing well after each addition. At first, the dough may look slippery or separated, but keep going. It will smooth out into a glossy, thick batter that slowly falls from the spoon.
Step – 3: Bake the base
Spread the dough evenly into a prepared baking dish. Don’t worry if it looks thin or uneven; it will puff dramatically in the oven. Bake until the top is golden and the surface looks dry and set. As it bakes, you’ll see it rise into beautiful peaks and valleys. That’s exactly what you want.
Step – 4: Cool completely
Once baked, remove the pan from the oven and let it cool completely. The base will deflate slightly as it cools, creating natural pockets for the cream layer. This is normal and part of the charm.
Step – 5: Make the cream layer
In a mixing bowl, beat the cream cheese until smooth and creamy. Gradually add the pudding mixture and milk, mixing until everything is well combined and silky. The texture should be thick but spreadable.
Step – 6: Assemble the cake
Spread the cream layer evenly over the cooled base, making sure it fills all the dips and pockets. Finish with a layer of whipped topping, smoothing it gently over the top.
Step – 7: Chill
Refrigerate the cake for several hours, or until fully set. This step transforms the dessert from good to unforgettable.
Substitutions
One of the best things about cream puff cake is how adaptable it is. If you’re missing an ingredient or want to tweak the flavor, there’s room to play.
You can swap the vanilla pudding for chocolate or caramel pudding if you want a richer, more indulgent flavor. For a lighter taste, using a reduced-fat cream cheese still works well, though the texture will be slightly softer.
If you don’t have whipped topping, freshly whipped cream sweetened lightly with sugar and vanilla makes a beautiful alternative. Even the milk can be adjusted slightly depending on what you have on hand, as long as you keep the filling thick and creamy.
Best Side Dish of Cream Puff Cake
This cake shines on its own, but pairing it thoughtfully can make dessert feel extra special.
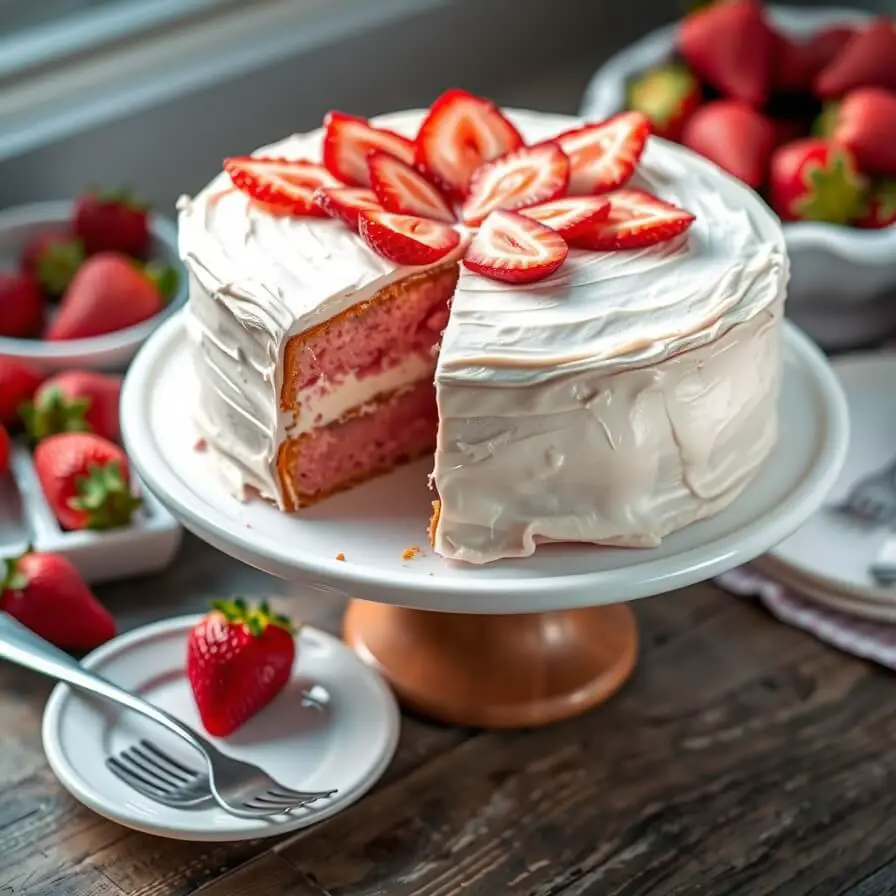
Fresh berries add a bright, slightly tart contrast that balances the creaminess perfectly.
A simple fruit salad works beautifully, especially if you’re serving this after a heavier meal.
A cup of strong coffee or espresso is my personal favorite pairing, cutting through the sweetness and rounding out the experience.
Serving and Presentation Tips
This is the kind of cake that doesn’t need much dressing up, which is part of its charm. Still, a little thoughtful presentation can turn it from a simple dessert into something that feels special and intentional.
I usually serve cream puff cake chilled, straight from the fridge. That cool temperature keeps the layers neat and makes each slice hold its shape. When slicing, a sharp knife wiped clean between cuts makes a big difference. You’ll get those clean layers that make people’s eyes light up before they even taste it.
For presentation, I like to keep things simple. A light dusting of powdered sugar over the top adds a soft, bakery-style finish without overwhelming the cake. If I’m serving guests, I sometimes scatter a few fresh berries around the platter rather than on the cake itself. It looks beautiful and lets people add fruit if they want.
If you’re serving this at a gathering, consider cutting it into smaller squares. This cake is rich, and smaller portions invite people to enjoy it without feeling overly full. On quiet evenings at home, though, I won’t lie, I cut myself a generous slice and savor it slowly.
Tips and Tricks to Make This Recipe Even Better
This recipe is already forgiving, but a few small details can really elevate it.
One of my favorite tricks is letting the baked base cool completely before adding the cream layer. Rushing this step can cause the filling to soften too much, which affects the final texture. Patience here pays off.
When mixing the dough, don’t be alarmed if it looks odd halfway through adding the eggs. It always comes together if you keep mixing. Trust the process. That glossy, thick batter is your sign that you’re on the right track.
For extra flavor, a splash of vanilla extract in the cream layer makes everything taste warmer and more rounded. Sometimes I’ll even add a tiny pinch of salt to the cream mixture. It sounds odd, but it balances the sweetness beautifully.
If you have time, chilling the cake overnight is one of the best things you can do. The layers settle, the flavors blend, and the texture becomes almost mousse-like. The next day, it’s even better than when you first made it.
Common Mistakes to Avoid
Even easy recipes have a few pitfalls, and knowing them ahead of time makes all the difference.
One common mistake is opening the oven too early while the base is baking. That sudden drop in temperature can prevent the dough from puffing properly. Let it bake undisturbed until it’s set and lightly golden.
Another issue is under-mixing or over-mixing the eggs into the dough. Adding them too quickly can make the batter lumpy, while over-mixing can make it too loose. Adding them one at a time and mixing just until smooth is the sweet spot.
Using warm ingredients for the cream layer can also cause problems. If the base is still warm, the filling may soften and slide. Always make sure everything is fully cooled before assembling.
Lastly, don’t skip the chilling time. This cake needs that rest in the fridge to become what it’s meant to be. Cutting it too soon can make it feel unfinished, even if it tastes good.
How to Store It
Cream puff cake stores surprisingly well, which makes it perfect for planning ahead.
Once assembled, keep the cake covered tightly in the refrigerator. It will stay fresh and delicious for up to three days. I often think it tastes best on the second day, once the flavors have had time to mingle.
If you’re storing individual slices, place them in an airtight container to prevent the cake from absorbing other fridge odors. Because of the creamy layers, this is not a cake I recommend leaving at room temperature for long periods.
Freezing isn’t ideal for the fully assembled cake, as the cream layers can change texture once thawed. However, you can freeze the baked base on its own if you want to prep ahead. Just thaw it completely before adding the filling.
FAQ
Can I make cream puff cake ahead of time?
Yes, and it’s actually encouraged. Making it a day in advance allows the texture to set and the flavors to deepen.
Why did my base puff unevenly?
That’s completely normal. The uneven surface creates pockets that hold the cream filling, which is part of what makes this cake so good.
Can I use homemade whipped cream instead of whipped topping?
Absolutely. Lightly sweetened whipped cream works beautifully and adds a fresh taste.
Is this cake very sweet?
It’s sweet, but balanced. The creamy layers are rich without being overwhelming, especially when served chilled.
Can I flavor the cream layer differently?
Yes. Chocolate, caramel, or even coffee-flavored pudding can be used to change things up while keeping the structure the same.

Cream Puff Cake Recipe
- Total Time: 1 hour plus chilling
- Yield: 12 1x
- Diet: Vegetarian
Description
This cream puff cake is a soft, airy, and irresistibly creamy dessert that feels both nostalgic and impressive. Inspired by classic cream puffs but made in an easy, shareable form, this cake features a light choux-style base topped with a smooth, velvety cream layer and finished with a fluffy topping. It’s the kind of dessert that looks like it took hours, yet comes together with simple ingredients and a calm approach. Perfect for family gatherings, celebrations, or quiet evenings when you want something comforting in the fridge, this recipe delivers bakery-style results without stress. Each chilled slice offers a beautiful contrast of textures and a balanced sweetness that keeps people coming back for more.
Ingredients
- Butter for the dough base
- Water
- All-purpose flour
- Eggs
- Cream cheese
- Vanilla pudding mix
- Milk
- Whipped topping or whipped cream
Instructions
- Heat butter and water together until melted and gently boiling, then stir in flour until a dough forms.
- Cool slightly, then add eggs one at a time, mixing until smooth and glossy.
- Spread the dough into a baking dish and bake until puffed and lightly golden.
- Allow the base to cool completely before topping.
- Beat cream cheese until smooth, then mix with pudding and milk until creamy.
- Spread the cream mixture over the cooled base and finish with whipped topping.
- Chill until fully set before slicing and serving.
Notes
- For best results, let the cake chill overnight. Use a sharp knife for clean slices, and wipe the blade between cuts. A light dusting of powdered sugar just before serving adds a lovely finish.
- Prep Time: 25 minutes
- Cook Time: 35 minutes
- Category: Dessert
- Method: Baking
- Cuisine: American
Nutrition
- Serving Size: 12
- Calories: 320
- Sugar: 18g
- Sodium: 260mg
- Fat: 22g
- Saturated Fat: 13g
- Unsaturated Fat: 7g
- Trans Fat: 0g
- Carbohydrates: 26g
- Fiber: 1g
- Protein: 6g
- Cholesterol: 120mg