Chocolate Pie Recipe
There are a few desserts that feel like home the moment they hit the table, and for me, chocolate pie sits right at the top of that list. I can’t tell you how many times this pie has made an appearance at our family gatherings, from quiet Sunday afternoons to chaotic holiday dinners where everyone claims they’re “too full for dessert” but somehow still manage a slice.
I remember the very first time I made it on my own. I had just moved into my first apartment—barely-functioning oven, mismatched pans, and a kitchen so small you had to step into the hallway just to stretch your arms. But the moment that silky chocolate filling set and the aroma of warm cocoa swirled around the room, I felt like I had unlocked a small secret to adulthood.
This chocolate pie is smooth, luscious, and unapologetically rich—like the kind that makes you pause mid-bite, set your fork down, and just enjoy the moment. It’s simple enough for a weekday treat, yet impressive enough to grace a holiday spread. And whether you’re serving it chilled on a warm afternoon or slicing into it warm alongside a cup of coffee, there’s something undeniably comforting about it.
Today, I’m sharing not just the recipe but the little details, cooking notes, and personal touches that take this pie from “good” to “I should have made two.”
Why I Love This Recipe

There are chocolate pies that are overly sweet or too dense, and then there’s this one—balanced, velvety, and effortlessly indulgent. What makes this recipe so special to me is how forgiving it is. Even when I’ve been distracted, rushed, or half-measuring ingredients while answering someone’s question across the room, the pie always turns out delicious.
It’s the perfect mix of old-fashioned comfort and modern ease. You don’t need fancy chocolate or high-end equipment; just everyday pantry staples transform into something that tastes like you spent hours fussing over it. That’s the magic of this recipe—it has depth without the drama.
Another reason I adore this pie is that it suits so many moods and occasions. Need a potluck dessert? Chocolate pie. Want something classic for a holiday? Chocolate pie. Hosting friends who “don’t like sweets”? They’ll still take a slice.
But above everything else, this recipe feels nostalgic. Every bite carries a sense of familiarity, like the desserts our grandmothers used to make—not complicated, not pretentious, just pure comfort. It’s the kind of pie people remember, ask for again, and quietly hope will be waiting on the counter when they walk into your kitchen.
Ingredients for Chocolate Pie
One of the best things about chocolate pie is how straightforward the ingredients are. Everything is simple, pantry-friendly, and easy to find, yet each ingredient plays a very specific role in building that luxurious texture and deep chocolate flavor.
You’ll need a good chocolate, of course. I prefer using semi-sweet because it creates a beautiful balance—rich but not overwhelming. If you’re someone who loves darker flavors, you can lean toward bittersweet.
Butter adds silkiness and helps the filling set into a smooth, glossy consistency.
Eggs are the heart of the pie. They thicken the custard and give it structure, so the filling becomes creamy instead of runny.
Sugar sweetens and softens the chocolate’s intensity, while a splash of vanilla brings warmth and rounds out all the flavors.
A little cornstarch or flour helps the pie set just right. Think of it as the quiet helper in the background, making sure each slice cuts cleanly.
And then, of course, the crust. You can use a traditional flaky pie crust or a graham cracker crust if you want a slightly sweeter, crunchier base. Both work beautifully—it just depends on your preference.
Simple ingredients, everyday convenience, and yet the end result tastes like something meant for special occasions.
How Much Time Will You Need?
This chocolate pie doesn’t demand hours from you—just a little patience at key moments.
The active prep time is around 15 minutes. You’ll need another 20 to 25 minutes for baking, depending on your oven. But the real magic happens during the cooling time. Give the pie at least 2 hours to fully set. If you slice too early, the filling might be too soft.
If you’re planning ahead for guests or an event, make it the night before. Overnight chilling gives it the perfect texture—firm enough to slice cleanly, but still decadently creamy.
How to Make This Chocolate Pie

Step – 1:
Start by preheating your oven and preparing your pie crust. If you’re using a homemade crust, roll it out gently and ease it into your pie dish, making sure not to stretch the dough. Dock the bottom with a few fork pricks to prevent puffing. If you’re using a graham crust, simply press it evenly and set it aside.
Step – 2:
Melt your chocolate and butter together. I like doing this in a small saucepan over low heat because it gives you more control, but the microwave works too—just heat in short bursts and stir often. Your goal is a smooth, glossy mixture that smells heavenly.
Step – 3:
In a separate bowl, whisk together the eggs, sugar, and vanilla until everything is blended. You don’t need to whip it dramatically; just make sure everything is fully combined. Then add the cornstarch and whisk again until smooth.
Step – 4:
Slowly pour the melted chocolate mixture into the egg mixture while whisking continuously. This step matters—adding the chocolate too quickly can scramble the eggs. A steady pour ensures a silky filling.
Step – 5:
Pour the filling into your prepared crust. Use a spatula to smooth the top so the pie bakes evenly.
Step – 6:
Bake until the edges are set but the center still has a slight jiggle. It will continue to firm up as it cools.
Step – 7:
Let the pie cool on the counter until it reaches room temperature, then chill it for a couple of hours. This is where the magic happens—the chocolate sets, the flavors deepen, and the texture becomes irresistibly creamy.
Substitutions
Sometimes you’re halfway through the recipe only to discover you’re missing something—and that’s okay. This pie adapts beautifully.
If you don’t have semi-sweet chocolate, you can use bittersweet or even milk chocolate. Just adjust the sugar slightly depending on sweetness.
No butter? You can use coconut oil for a subtle coconut undertone that pairs surprisingly well with chocolate.
If you’re avoiding dairy altogether, use dairy-free chocolate and a plant-based butter substitute. The filling will still set beautifully.
Gluten-free? Use a gluten-free pie crust or a simple crushed nut crust for a unique, flavorful twist.
If eggs are a concern, you can use a custard pie-style filling with cornstarch and milk (though the texture will shift slightly toward pudding pie).
The beauty of this recipe is that it welcomes small changes without losing its charm.
Best Side Dish of Chocolate Pie
To make your chocolate pie moment even better, pair it with one of these:
Whipped cream
Fresh berries
Vanilla ice cream
Each option adds a different layer—lightness, freshness, or a hot-and-cold contrast—that complements the rich chocolate perfectly.
Serving and Presentation Tips
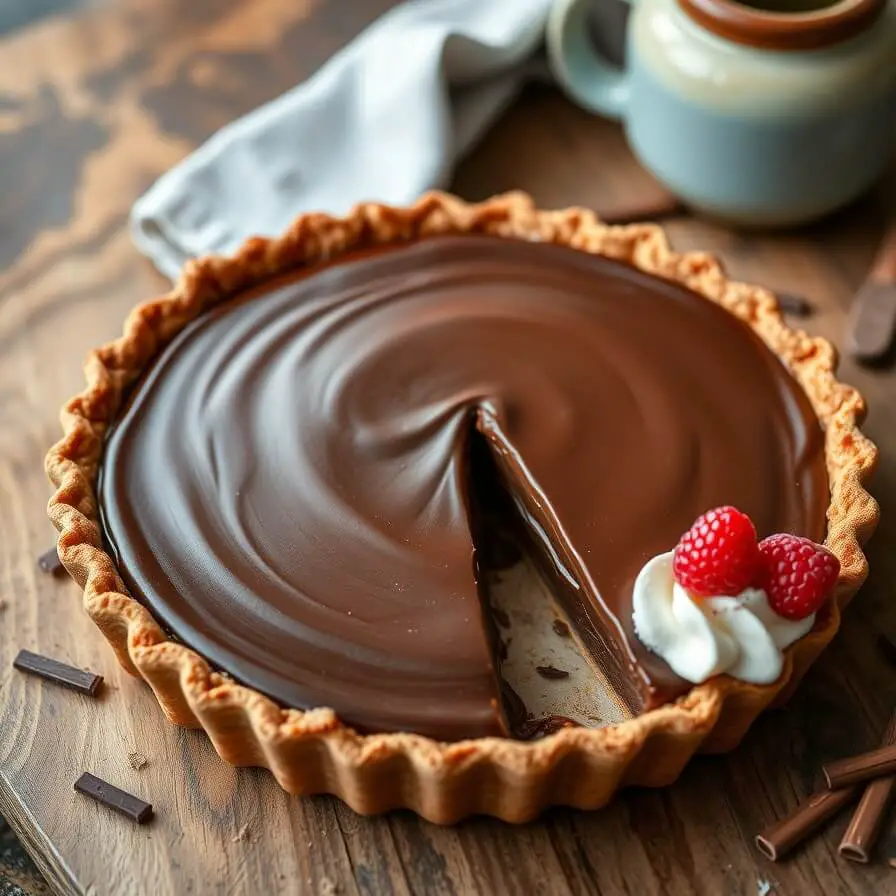
There’s something almost magical about the moment a chocolate pie is sliced and placed on a plate—the glossy top, the clean cut, the soft filling holding its shape just enough. To make that moment even more special, I love serving this pie in a way that feels warm, welcoming, and just a bit indulgent.
A simple hook I always tell friends: “Chocolate pie doesn’t need much help to look stunning, but a little thoughtful presentation can make it unforgettable.”
I like to start by chilling the pie long enough to ensure perfectly smooth slices. Running a sharp knife under warm water before each cut helps keep the edges neat. Then, depending on the mood or occasion, I add touches that instantly elevate the look.
A small dollop of whipped cream off to the side gives the plate a soft, cloudlike contrast. Fresh raspberries or sliced strawberries scattered lightly around the slice brighten the rich chocolate color. If I’m feeling a bit extra, I’ll shave some dark chocolate over the top or add a light dusting of cocoa powder.
Using a white or neutral plate helps the pie stand out, while a dark plate creates a moody, dramatic effect—perfect for dinner parties. No matter how you present it, keep it simple, intentional, and true to your style.
Tips and Tricks to Make This Recipe Better

Here’s the hook I like to share: “Great chocolate pie isn’t about complicated steps—it’s about the little choices that make each bite unforgettable.”
Over the years, I’ve found a few tricks that consistently improve the outcome:
Use good-quality chocolate. It doesn’t need to be fancy, but choose something you genuinely enjoy eating on its own.
Let the filling cool slightly before pouring it into the crust to prevent sogginess.
Blind-bake your pie crust if you prefer a crisp base. This helps prevent a soft or doughy bottom.
Don’t skip the chill time. This pie becomes creamier and more stable the longer it rests.
If you want deeper flavor, add a pinch of espresso powder. It doesn’t make the pie taste like coffee—it just strengthens the chocolate notes.
Whisk gently. Overmixing incorporates too much air and can cause cracks.
These small adjustments can turn a simple pie into a recipe that earns compliments again and again.
Common Mistakes to Avoid
Hook: “Even the easiest chocolate pies can go sideways if you’re not watching the little things.”
One common mistake is overheating the chocolate. If the mixture becomes too hot, it can burn or seize, ruining the texture. Always melt gently and slowly.
Another mistake is combining hot chocolate with cold eggs too quickly. This can scramble the eggs, leaving the filling grainy. Pour slowly and whisk continuously.
Some people slice the pie before it has cooled and set fully. This leads to a messy, soupy center. Always allow proper cooling time.
Overbaking is also a culprit. Chocolate pie should have a slight jiggle in the center. If you wait until it’s fully set in the oven, it will become dry once cooled.
Skipping crust preparation—like docking or blind-baking—can result in a soggy bottom, especially if using a traditional pie crust.
By keeping an eye on these details, you’ll get that perfect silky-smooth texture every single time.
How to Store It
Chocolate pie stores beautifully, making it perfect for make-ahead desserts.
Refrigerate the pie in an airtight container or cover it tightly with plastic wrap. It will stay fresh for 3 to 4 days without losing flavor or texture.
If you prefer serving it chilled, you can slice it straight from the refrigerator. For a softer, creamier bite, let each slice rest at room temperature for 10–15 minutes before serving.
You can also freeze this pie. Wrap it tightly in plastic wrap, then add a layer of foil. Freeze for up to one month. Thaw in the refrigerator overnight before serving.
Avoid leaving it at room temperature for too long, especially in warm climates, as the filling may soften more than you’d like.
FAQ
Is this chocolate pie best served warm or chilled?
Chilled is traditional and gives the pie its clean-cut slices, but letting it sit for a few minutes at room temperature softens the filling into a silky, pudding-like texture.
Can I use milk chocolate instead of semi-sweet?
Yes, though the pie will be sweeter. Reduce the sugar slightly to maintain balance.
Can I make this pie ahead of time?
Absolutely. In fact, making it a day ahead enhances the texture and flavor.
Why did my chocolate filling crack on top?
This usually happens from overbaking or whisking too much air into the filling. Aim for a gentle mix and remove the pie while the center still jiggles slightly.
Can I use a store-bought crust?
Definitely. Store-bought crusts work well and save time, especially for busy days.

Chocolate Pie Recipe
- Total Time: 2 hours 40 minutes (including cooling)
- Yield: 9 1x
- Diet: Vegetarian
Description
A silky, rich, and nostalgic chocolate pie that feels like a warm hug on any day of the week. This recipe creates a beautifully smooth filling that balances sweetness and depth without being overwhelming. It’s easy enough for casual baking yet elegant enough for special occasions. Whether served with whipped cream, fresh berries, or a scoop of ice cream, each bite melts effortlessly, offering that classic homemade comfort everyone loves. With simple ingredients and thoughtful steps, you’ll have a pie that slices cleanly, tastes luxurious, and keeps people coming back for seconds.
Ingredients
- Semi-sweet chocolate
- Butter
- Eggs
- Granulated sugar
- Vanilla extract
- Cornstarch
- Pie crust (graham or traditional)
Instructions
- Melt the chocolate and butter gently until smooth.
- Whisk eggs, sugar, vanilla, and cornstarch together in a separate bowl.
- Slowly incorporate the melted chocolate into the egg mixture.
- Pour into a prepared pie crust and smooth the top.
- Bake until the edges are set and the center has a slight jiggle.
- Cool completely, then chill to set the texture.
Notes
- Letting the pie rest overnight creates the best flavor and texture. Use warm water to heat your knife before slicing for clean edges.
- Prep Time: 15 minutes
- Cook Time: 25 minutes
- Category: Dessert
- Method: Baking
- Cuisine: American
Nutrition
- Serving Size: 9
- Calories: 370
- Sugar: 26g
- Sodium: 160mg
- Fat: 22g
- Saturated Fat: 12g
- Unsaturated Fat: 8g
- Trans Fat: 0g
- Carbohydrates: 39g
- Fiber: 3g
- Protein: 5g
- Cholesterol: 75mg