Better Than Carnival Fried Oreos
I’ll never forget the first time I tried making fried Oreos at home. I thought it would be a breeze—just dunk cookies in batter and fry them golden brown. Simple, right? Well, my first batch told a different story. I misjudged the oil temperature and ended up with Oreos that were slightly crispy on the outside but oozing chocolate mush inside. The kitchen smelled like burnt sugar for hours.
But here’s the thing—I learned more from that burnt batch than from any perfect recipe. Adjusting the heat, testing the batter consistency, and listening to the sizzle taught me the rhythm of frying like nothing else. By the third attempt, I had golden, pillowy fried Oreos with chocolate that hadn’t leaked out, and my kids were already hovering over the plate, forks in hand. Now, making them has become a weekend tradition in our house, especially when we want a carnival-style treat without leaving the kitchen.
Pro Notes from My Early Mishaps
Before diving into the ingredients, let me share a few lessons from my fried Oreo adventures:
- Oil temperature is everything. Too hot, and the batter browns too quickly while the cookie stays frozen inside. Too low, and you end up with greasy, soggy treats. I keep a candy thermometer handy at 350°F—it’s a game-changer.
- Don’t overcrowd the pan. I learned this the hard way. Adding too many cookies at once drops the oil temperature drastically, giving you unevenly fried cookies. One at a time—or two if you’re feeling confident—is plenty.
- Batter consistency matters. Too thin, and it slides off the cookies; too thick, and it clumps. Aim for a coating that clings but isn’t gloppy. A good tip: scoop a teaspoon of batter and see if it coats the back of a spoon smoothly.
These are small adjustments, but they make the difference between a “meh” fried Oreo and the kind that disappears before you even finish plating.
Ingredients in Context
Now, let’s talk ingredients. What’s great about fried Oreos is that you don’t need a pantry full of exotic items. But quality matters.
- Oreos: Standard, classic Oreos work best. Double-stuffed are fun if you want extra cream filling, but they can ooze more, so handle gently.
- All-purpose flour: This forms the base of your batter. For a slightly lighter texture, I sometimes mix in a bit of cornstarch.
- Baking powder and salt: These lift the batter just enough without overpowering the sweetness.
- Sugar: A touch in the batter helps it caramelize slightly during frying, giving that golden color.
- Milk: Whole milk creates a creamier batter, but 2% works fine. For a dairy-free version, almond or oat milk is a great substitute.
- Eggs: They bind the batter. Fresh eggs make the difference in texture—older eggs sometimes give a thinner batter.
- Vanilla extract: A splash adds warmth and depth. Don’t skip it; it makes a subtle but noticeable difference.
- Oil for frying: Vegetable, canola, or peanut oil work. I prefer neutral oils with a high smoke point to avoid overpowering the Oreo flavor.
Optional finishing touches include a sprinkle of powdered sugar, a drizzle of chocolate or caramel, or even a little sea salt to balance the sweetness.
What I Love About This Deep-fried Oreo Recipe
What makes fried Oreos so irresistible? It’s that contrast. You get the crunchy, golden exterior giving way to the soft, sweet cookie and creamy filling inside. There’s a subtle caramelization from frying that makes the chocolate and cream taste richer.
The warmth also enhances the flavor—the chocolate melts just enough to create a gooey center, while the batter provides a neutral, slightly crispy frame. If you want to elevate the treat, adding a pinch of cinnamon or a touch of espresso powder to the batter can deepen the flavor in unexpected ways.
There’s also a sensory magic: the sizzle when the Oreo hits the hot oil, the smell wafting through the kitchen, the first bite that gives a little crunch followed by soft, sweet filling. That’s what keeps my family coming back for more, week after week.
How to Make This Oreo Recipe: Step-by-Step Instructions
Here’s my tried-and-true method, including those sensory cues that make frying Oreos feel more like a craft than a chore.
- Prep your station. Pour oil into a deep skillet or pot until it’s about 2 inches deep. Heat it to 350°F. Lay a plate with paper towels nearby to drain the fried cookies.
- Make the batter. In a bowl, whisk together 1 cup flour, 1 teaspoon baking powder, a pinch of salt, 2 tablespoons sugar, 1 egg, ½ cup milk, and 1 teaspoon vanilla. The batter should be smooth and coat the back of a spoon.
- Dip the Oreos. Using a fork or tongs, dip each Oreo into the batter, letting excess drip off gently. Avoid shaking too vigorously—you want a smooth coat, not a splatter.
- Fry carefully. Slide the coated Oreo into the hot oil. It should sizzle gently, not erupt. Fry for about 2–3 minutes, turning once, until golden brown. Use a slotted spoon to lift them out.
- Drain and cool slightly. Place fried Oreos on paper towels for a few seconds to remove excess oil. Don’t wait too long; they’re best warm and soft.
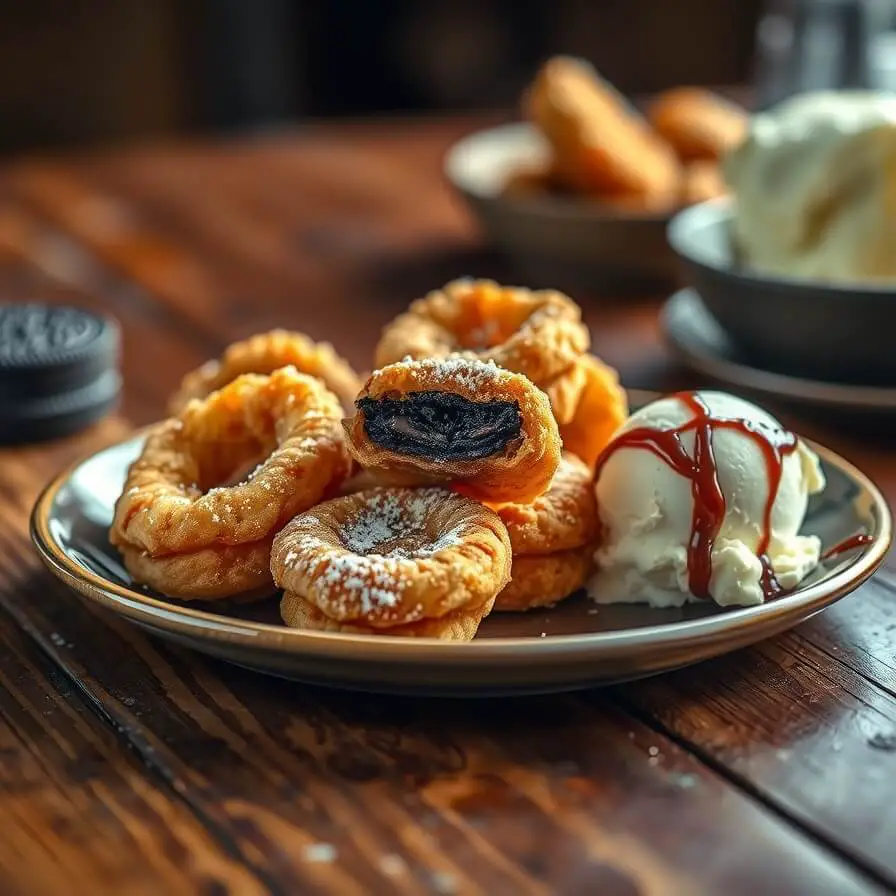
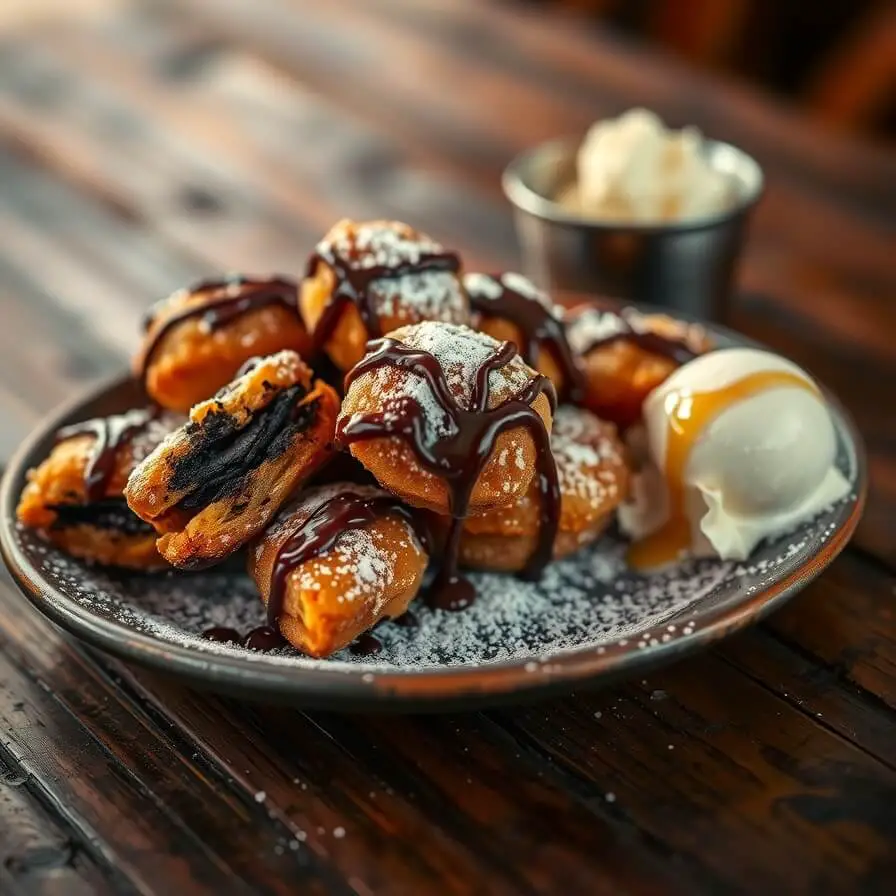
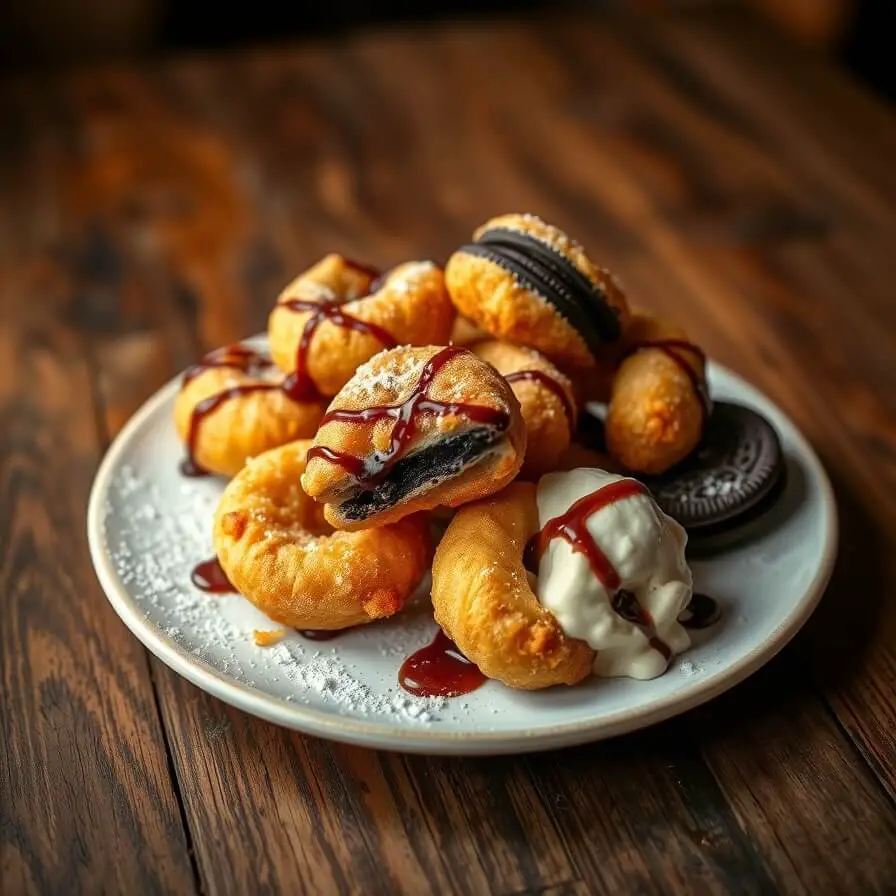
- Serve with flair. Dust with powdered sugar, drizzle with chocolate or caramel, or even add a small scoop of vanilla ice cream on the side.
A little note: The first batch always seems to fry faster. I call it the “test batch.” Adjust your temperature slightly if needed.
Substitutions & Adaptations
Fried Oreos are surprisingly versatile. Here are some ways to tweak them:
- Vegan: Use plant-based milk and an egg replacer (like flax or chia egg) in the batter. Most Oreos are already dairy-free, but double-check labels.
- Gluten-free: Swap in a gluten-free all-purpose blend. The texture might be slightly different, but the flavor is still spot-on.
- Kid-friendly twist: Roll Oreos in rainbow sprinkles after dipping in batter, before frying, for a fun, festive version.
- Flavor variation: Add a teaspoon of cocoa powder or a pinch of cinnamon to the batter for a flavor twist.
These little tweaks let you make the recipe your own, whether for dietary needs, holidays, or just a creative afternoon in the kitchen.
Serving Ideas That Impress
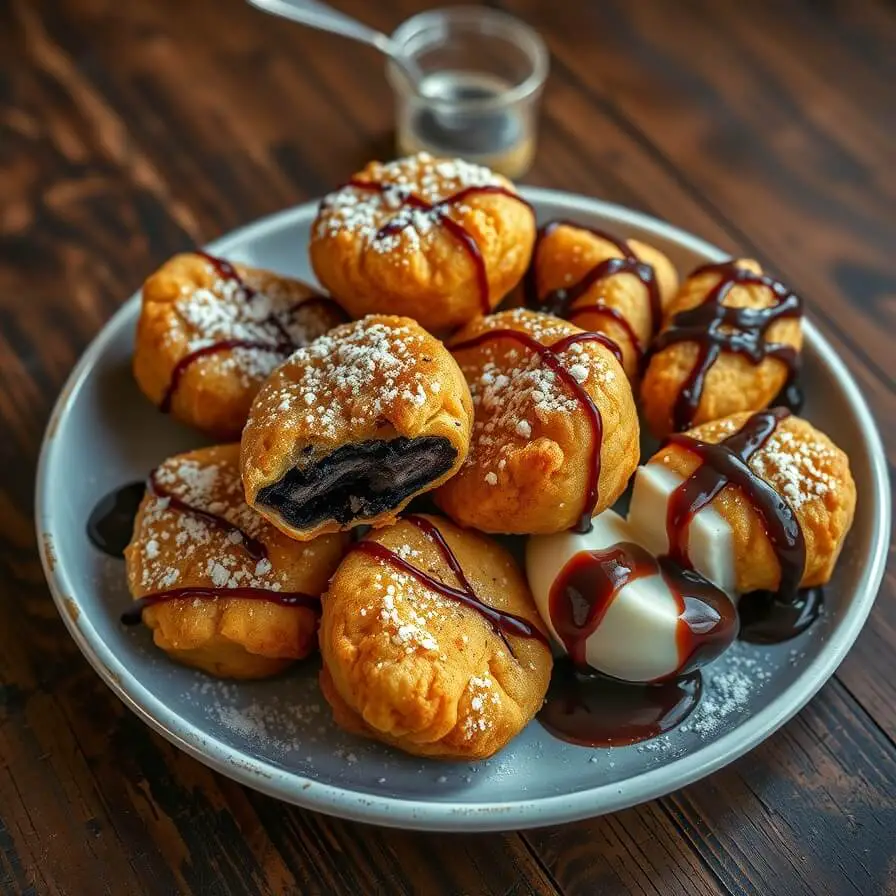
Fried Oreos are a showstopper on their own, but presenting them creatively takes the treat to the next level. I like to serve them on a small platter with a light dusting of powdered sugar and a drizzle of warm chocolate sauce. Sometimes, I nestle a scoop of vanilla ice cream beside them—the heat from the Oreos slightly melts the ice cream, creating a dreamy, gooey dessert.
For a festive twist, try topping them with sprinkles, crushed nuts, or a few fresh berries. At a recent family movie night, I arranged fried Oreos in a circle like mini donuts and watched my kids’ eyes light up—they tasted as good as they looked.
Another favorite method is to serve them in small paper cones for a carnival-style vibe. Not only is it fun, but it keeps fingers cleaner, especially for kids who tend to dive straight in.
Pro Notes & Common Mistakes
Even after making fried Oreos hundreds of times, a few pitfalls can sneak up on you. Here’s what I keep in mind:
- Oil temperature is key. Too hot, and the cookies brown too fast; too cold, and they get greasy. Invest in a small candy thermometer—it’s worth every cent.
- One at a time (or two max). Overcrowding the pan drops the oil temperature, which leads to uneven cooking.
- Don’t let batter sit too long. If it thickens too much while waiting, the coating will clump. Mix fresh or give it a quick stir before dunking.
- Timing the flip. Turn Oreos gently with a slotted spoon once the first side is golden; waiting too long can cause the batter to stick or break apart.
A funny lesson from my early attempts: I once left the batter unattended while frying, and the first cookie stuck to the pan and flipped over unexpectedly—chocolate everywhere! Ever since, I stay focused and fry with patience.
Storage & Make-Ahead Tips
Fried Oreos are best enjoyed warm, but sometimes leftovers happen. Here’s how to handle them:
- Short-term: Store in an airtight container at room temperature for up to 1 day. They lose a bit of crispiness but still taste amazing.
- Reheating: Pop them in a 350°F oven for 5–7 minutes to refresh the crisp exterior. Microwave works too, but they’ll be softer.
- Freezing: You can freeze unfried, batter-coated Oreos on a tray, then transfer to a zip-top bag for up to a month. Fry straight from frozen—just add a minute or two to cooking time.
Pro tip: Don’t pre-fry and store for later. Fried Oreos lose that magical crisp-soft contrast after a few hours. They’re meant to be enjoyed fresh.
Frequently Asked Questions
Can I use different cookies?
Yes! Chocolate sandwich cookies work best, but you can experiment with peanut butter, mint, or birthday cake-flavored cookies. Keep an eye on the frying time—they may cook faster or slower depending on size and filling.
Is there a healthier way to make them?
While they’re inherently indulgent, you can try baking them instead. Coat Oreos in a thin layer of batter and bake at 375°F for 10–12 minutes. They won’t be as crisp or gooey but still fun and tasty.
Can I make mini versions?
Absolutely! Mini Oreos fry faster—usually 1–2 minutes per side. They’re perfect for bite-sized snacks or party platters.
Why did my Oreos fall apart?
Most often, this happens if the batter is too thick or the oil too hot. Make sure the batter clings gently and maintain 350°F in the oil. A slotted spoon helps flip them carefully.

Fried oreos Recipe
- Total Time: 30 minutes
- Yield: 12 1x
- Diet: Vegetarian
Description
Fried Oreos are a decadent, carnival-inspired treat that combines crispy batter with soft, sweet cookies. Perfect for weekend indulgence or family movie nights, this recipe guides you through each step, ensuring golden perfection every time.
Ingredients
- 12 Oreo cookies (classic or double-stuffed)
- 1 cup all-purpose flour
- 1 teaspoon baking powder
- Pinch of salt
- 2 tablespoons sugar
- 1 egg
- ½ cup milk (or dairy-free alternative)
- 1 teaspoon vanilla extract
- Vegetable oil, for frying
- Optional: powdered sugar, chocolate or caramel drizzle, ice cream, sprinkles
Instructions
- Pour oil into a deep skillet or pot until 2 inches deep. Heat to 350°F. Prepare a plate with paper towels.
- In a bowl, whisk together flour, baking powder, salt, and sugar. Add egg, milk, and vanilla. Stir until smooth.
- Dip each Oreo into batter, letting excess drip off.
- Carefully place coated Oreos in hot oil, frying 2–3 minutes, turning once, until golden brown.
- Remove with a slotted spoon and drain on paper towels.
- Serve warm with optional powdered sugar, chocolate drizzle, or a scoop of ice cream.
Notes
- Maintain oil at 350°F for even frying.
- Fry 1–2 Oreos at a time to avoid overcrowding.
- Batter should coat the cookie lightly; adjust thickness if needed.
- Enjoy immediately for the best texture.
- Prep Time: 10–15 minutes
- Cook Time: 15–20 minutes
- Category: Dessert
- Method: Frying
- Cuisine: American
Nutrition
- Serving Size: 12
- Calories: 220
- Sugar: 14g
- Sodium: 95mg
- Fat: 13g
- Saturated Fat: 3g
- Unsaturated Fat: 9g
- Trans Fat: 0g
- Carbohydrates: 25g
- Fiber: 1g
- Protein: 2g
- Cholesterol: 30mg