
I’ve always loved the idea of cheesecake — rich, creamy, and indulgent — but the thought of baking one always felt a bit intimidating. That’s why I started making no bake cheesecake filling instead. It’s a simple, foolproof way to get that velvety texture and luscious flavor without heating up the oven or waiting hours for it to bake. Whether you’re a busy home cook or just looking for a quick, delicious dessert base, this no bake cheesecake filling recipe is your perfect go-to.
The beauty of this recipe is in its simplicity and versatility. You can whip it up in minutes, and it works wonderfully as a filling for tarts, parfaits, or even as a creamy dip. Plus, it’s so smooth and dreamy, it almost melts in your mouth. If you’ve been hesitant to try cheesecake at home because of the baking process, this recipe is a game changer. Keep reading, and I’ll walk you through every step to make the perfect no bake cheesecake filling!
Why I Love This Recipe

What makes this no bake cheesecake filling so special is how effortlessly you can create a luscious, creamy dessert base without any baking required. It’s a lifesaver on hot days when you don’t want to turn on the oven, or when you want a last-minute treat without the hassle of complicated techniques.
Another reason I adore this recipe is its versatility. You can customize it easily by adding flavors like lemon zest, vanilla, or even a splash of your favorite liqueur. Plus, because it sets in the fridge, it’s perfect for layering with fresh fruit, cookies, or chocolate to create elegant and tasty desserts.
Many people make this filling because it’s a classic base that can be dressed up or down depending on the occasion. It’s creamy but light, tangy but sweet — all the hallmarks of a traditional cheesecake, without the fuss. And for anyone who wants to impress guests or just treat themselves to a homemade dessert, this recipe never fails to deliver rich, satisfying flavor with minimal effort.
Ingredients for No Bake Cheesecake Filling
To make this delicious no bake cheesecake filling, you’ll need just a handful of everyday ingredients that come together beautifully:
- Cream cheese: The star of the recipe, providing that signature tang and creaminess. Use full-fat for the best texture and flavor.
- Powdered sugar: Adds sweetness without the graininess that granulated sugar can sometimes bring to a no bake filling.
- Heavy cream: Whipped to soft peaks, this gives the filling its airy, light texture.
- Vanilla extract: A touch of pure vanilla enhances all the flavors and adds warmth.
- Lemon juice (optional): Just a bit to brighten the filling and add a subtle tang that balances the sweetness.
These ingredients are simple, but the magic happens when you combine them correctly. Make sure your cream cheese is softened to room temperature — this will help you achieve a silky smooth texture without lumps.
How Much Time Will You Need
One of the best things about this recipe is how fast it comes together.
From start to finish, it takes about 10 to 15 minutes to prepare the filling itself. Then, you’ll want to chill it in the fridge for at least 2 to 3 hours to allow it to firm up and develop that perfect cheesecake texture.
If you’re pressed for time, you can sometimes get away with just an hour in the fridge, but the longer it chills, the better it sets. Overall, this is a quick and convenient recipe for a dessert that tastes like it took hours of effort.
How to Make This No Bake Cheesecake Filling

Step – 1: Begin by softening your cream cheese. Leave it out at room temperature for about 30 minutes beforehand. This is crucial to avoid lumps and ensure a smooth filling.
Step – 2: In a large mixing bowl, beat the cream cheese with an electric mixer on medium speed until it’s completely smooth and creamy.
Step – 3: Gradually add the powdered sugar to the cream cheese while continuing to beat, making sure it’s fully incorporated. This step sweetens the filling and helps keep it silky.
Step – 4: Add the vanilla extract and lemon juice (if using) to the mixture and beat again to blend evenly.
Step – 5: In a separate chilled bowl, whip the heavy cream with clean beaters until soft peaks form. This means when you lift the beaters, the cream will hold a gentle peak but still be soft and pliable.
Step – 6: Gently fold the whipped cream into the cream cheese mixture. Be careful not to overmix — you want to keep as much air as possible in the whipped cream to keep the filling light and fluffy.
Step – 7: Once combined, transfer the filling into your serving dish or use it as a layer in pies, parfaits, or other desserts.
Step – 8: Cover the dish with plastic wrap and refrigerate for at least 2 to 3 hours until the filling is firm and set.
Substitutions
If you’re looking to tweak the recipe or have some dietary preferences, there are several substitutions you can try without sacrificing texture or flavor.
For cream cheese, if you want a lighter option, you can use Neufchâtel cheese, which has less fat but a similar taste and texture.
If you don’t have heavy cream, whipping coconut cream is a fantastic dairy-free alternative that will add richness and body while keeping the filling light.
Powdered sugar can be swapped with a natural sweetener like powdered erythritol or a blend of powdered stevia, perfect for those watching their sugar intake.
For a hint of zestiness without lemon juice, a little bit of orange juice or lime juice can add an interesting twist.
Finally, if vanilla extract is unavailable, vanilla bean paste or even almond extract can be used to impart a unique flavor profile.
Best Side Dish of No Bake Cheesecake Filling
To elevate the experience of enjoying your no bake cheesecake filling, pairing it with these side treats really makes a difference:
- Fresh berries (strawberries, blueberries, raspberries): The natural tartness and juiciness cut through the richness and add vibrant color.
- Graham cracker crust or cookies: Provide a satisfying crunch and classic cheesecake accompaniment.
- Chocolate drizzle or shaved chocolate: Adds a hint of indulgent bitterness and texture contrast.
These sides not only enhance the flavors but also add variety and excitement to your dessert presentation.
Serving and Presentation Tips
There’s something incredibly satisfying about not only making a dessert that tastes amazing, but also presenting it in a way that makes everyone say “Wow!” — and this no bake cheesecake filling is made for that moment.
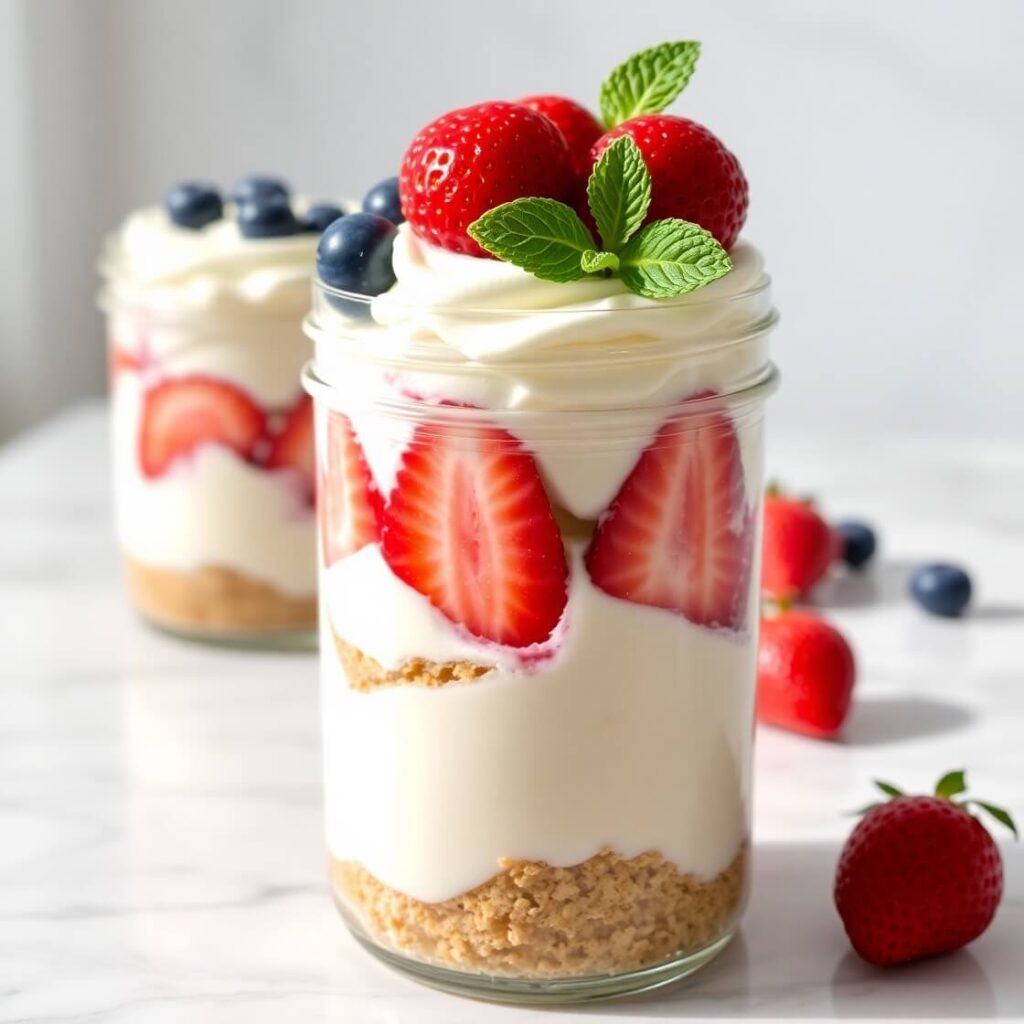
You can serve it in individual glass jars or ramekins for a personal touch, especially if you’re hosting a gathering or holiday dinner. Layer the filling with crushed graham crackers, cookie crumbs, or fruit compote to create elegant parfait-style desserts.
If you’re using it in a tart shell or pie crust, smooth the top with a spatula, then add a swirl of whipped cream or fresh fruit on top. A few mint leaves or a light dusting of powdered sugar can make it look extra special. You can even pipe the filling using a large star tip for a beautifully textured finish in a dessert cup or crust.
Whatever you choose, remember that this dessert is creamy and soft, so serving it chilled and using a cold plate or bowl will help keep its texture just right.
Tips and Tricks to Make This Recipe Better
The charm of this recipe is in its simplicity, but a few thoughtful tricks can take it from great to unforgettable.
First, always use room-temperature cream cheese. Cold cream cheese is hard to mix and can leave little lumps in your filling, no matter how long you beat it.
Use full-fat ingredients for the best flavor and structure. This isn’t the time to go light — the richness is what makes the filling hold its shape and taste heavenly.
When whipping your cream, chill the bowl and beaters in the freezer for 10–15 minutes beforehand. This helps the cream whip up faster and hold its peaks longer.
And when folding the whipped cream into the cream cheese base, do it gently. This is what gives the filling its signature airiness. Overmixing can deflate the whipped cream and leave you with a denser texture.
Lastly, be patient when chilling. Give it at least 2 to 3 hours to set fully before serving. If you can, chill it overnight — the texture and flavor get even better.
Common Mistakes to Avoid
Even though this recipe is super approachable, there are a few pitfalls that can affect the end result. Here’s how to avoid them:
Skipping the softening step for cream cheese is the most common mistake. It might seem like a shortcut to beat it straight from the fridge, but it just won’t get smooth enough.
Overmixing the filling after you add the whipped cream can knock all the air out of it. Be gentle with your folding technique — it’s key to getting that airy, fluffy bite.
Using granulated sugar instead of powdered sugar can result in a grainy texture. Stick with powdered sugar to keep the filling silky smooth.
Serving before it’s set is another easy misstep. If you don’t let the filling chill long enough, it might be too soft to hold its shape when sliced or scooped.
And finally, using low-fat cream cheese or cream substitutes without adjusting the ratios can result in a runny or overly soft filling. Stick with full-fat when possible, or follow the substitution tips carefully.
How to Store It
One of the best things about this no bake cheesecake filling is how well it stores.
Once made, transfer the filling to an airtight container or cover the serving dish tightly with plastic wrap. Store it in the refrigerator for up to 5 days. The flavor will stay fresh, and the texture will remain stable if it’s kept cold the whole time.
If you want to make it in advance, this filling also freezes beautifully. Spoon it into a freezer-safe container, press a piece of parchment or plastic wrap directly onto the surface to prevent freezer burn, then seal it. It can be frozen for up to 2 months. Thaw overnight in the fridge before using.
Just remember: once thawed, give it a gentle stir to restore its texture before serving.
FAQ
Can I use this filling for a full cheesecake?
Yes, this filling works perfectly for no bake cheesecakes. Just spread it evenly into a prepared crust and chill it until fully set.
Is there a dairy-free version?
Absolutely. Use vegan cream cheese and whipped coconut cream in place of traditional dairy ingredients. Make sure your sugar is vegan-certified too.
Can I flavor the filling differently?
Yes, this recipe is super flexible. Try adding lemon zest, almond extract, cocoa powder, or even a swirl of fruit puree for a twist.
How do I keep it from being too runny?
Use full-fat ingredients, make sure the whipped cream is at soft peaks, and chill the filling thoroughly. Don’t skip these steps!
Can I pipe this filling?
Yes! It holds its shape beautifully and is ideal for piping into tart shells, dessert cups, or layered parfaits.

No Bake Cheesecake Filling
This no bake cheesecake filling is everything you want in a dessert — smooth, creamy, and irresistibly rich, yet light enough to enjoy after any meal. Made with just a few ingredients and no oven required, it’s the perfect quick dessert solution for busy days or last-minute entertaining. Whether spooned into a tart shell, layered in a parfait, or eaten with fresh berries, this recipe delivers a luscious cheesecake flavor in every bite. The best part? It comes together in just minutes and can be made ahead of time. Simple, elegant, and always a crowd-pleaser.
- Total Time: 3 hours (with chilling)
- Yield: 6
Ingredients
- 2 (8 oz) blocks cream cheese, softened
- ¾ cup powdered sugar
- 1 tsp pure vanilla extract
- 1 tbsp lemon juice (optional)
- 1 cup heavy whipping cream, chilled
Instructions
- In a large mixing bowl, beat softened cream cheese until smooth.
- Gradually add powdered sugar and mix until fully combined.
- Add vanilla extract and lemon juice, beating again to blend.
- In a separate chilled bowl, whip heavy cream until soft peaks form.
- Gently fold the whipped cream into the cream cheese mixture until fully incorporated.
- Spoon into crusts, jars, or serving dishes and chill for at least 2–3 hours.
Notes
- Use full-fat cream cheese for the best texture.
- Let the filling chill overnight for a firmer, more sliceable texture.
- Customize with citrus zest, cocoa, or fruit swirls for variety.
- Prep Time: 15 minutes
- Cook Time: 0 minutes
- Category: Dessert
- Method: No Bake
- Cuisine: American
- Diet: Vegetarian
Nutrition
- Serving Size: 6
- Calories: 360
- Sugar: 16g
- Sodium: 210mg
- Fat: 30g
- Saturated Fat: 18g
- Unsaturated Fat: 10g
- Trans Fat: 0g
- Carbohydrates: 19g
- Fiber: 0g
- Protein: 4g
- Cholesterol: 100mg